Overview
Automate Billing Software is a desktop billing application available in four editions — Retail Billing Suite, GST Billing Pro, Restaurant Billing and Wholesale & Distribution. Every edition shares the same automation engine: invoices, tax calculation, stock levels and backups all update automatically as you work.
This documentation covers installation, day-to-day use of each core feature, and answers to common questions. Use the sidebar to jump to a section, or search above.
Installation
Download the setup file for your edition from the Downloads page, then follow these steps:
- Run the downloaded setup file and allow it through your firewall/antivirus prompt if asked.
- Choose an install location, or use the recommended default path.
- Wait for installation to complete, then launch Automate Billing from the desktop shortcut.
- Activate your copy using the license key emailed to you at signup (or continue in trial mode).
First-time setup
On first launch, a setup wizard walks you through configuring your business:
- Business name, address and GSTIN (if applicable)
- Invoice numbering format and starting number
- Item/product list — added manually or imported from a spreadsheet
- Default tax slabs per item category
Once complete, the software is ready to bill — every subsequent sale automatically applies these settings.
Invoicing
To create an invoice, add items to the current sale by scanning a barcode, searching by name, or selecting from the product grid. Automate Billing calculates line totals, discounts and tax automatically.
Saving and sharing invoices
Press Ctrl + S to finalize an invoice. From the invoice preview you can print directly, export as PDF, or share via WhatsApp/email if configured.
Editing or cancelling an invoice
Open any invoice from the Sales History screen to reprint, cancel, or issue a credit note against it. Cancelled invoices are kept in your records for audit purposes rather than deleted.
GST & tax
Each product is assigned an HSN/SAC code and tax slab when added to your catalog. Automate Billing applies the correct CGST/SGST or IGST split automatically based on the customer's state.
Generating GST reports
- Go to Reports → GST Reports.
- Select the return period (monthly or quarterly).
- Choose GSTR-1 or GSTR-3B format and click Export.
Inventory
Stock quantities update the moment an invoice is finalized — no manual adjustment needed. Purchase entries add stock back automatically, keeping counts accurate at all times.
- Set a reorder threshold per item to get low-stock alerts
- Track batches and expiry dates for perishable goods
- Run a manual stock audit anytime from Inventory → Stock Count
User management
Add staff accounts from Settings → Users and assign one of three roles:
- Cashier — can create invoices and view today's sales only.
- Manager — full billing access plus reports and inventory management.
- Admin — full access, including user management and settings.
Every action is recorded in the activity log under Settings → Activity Log, searchable by user and date.
Backup & restore
Automate Billing runs an automatic backup on a schedule you set (default: every 24 hours) and stores it locally and to the cloud when internet is available.
Restoring from backup
- Go to Settings → Backup & Restore.
- Select a backup by date from the list.
- Click Restore and confirm — the app will restart with the restored data.
Troubleshooting
Installer blocked by antivirus/SmartScreen
Choose "More info" → "Run anyway" on the Windows SmartScreen prompt, or add an exception in your antivirus software. This is common for new installers that haven't yet built up download reputation.
Printer not detected
Confirm the printer is set as the default in Windows before opening Automate Billing, then restart the application so it can detect the printer.
Software won't open after install
Reinstall using "Run as Administrator," and confirm your system meets the minimum requirements listed on the Downloads page.
Frequently asked questions
Support
Still stuck? Reach out and we'll help you get set up.
- Email: support@automatebilling.app
- Include your edition name and license email so we can respond faster
About Automate — Medicine Billing Software
Automate is a desktop billing, inventory and GST software built specifically for pharmacies and medical stores. It handles medicine billing with batch and expiry tracking, purchase and inventory management, customer/supplier credit, GST-compliant reporting, automatic backups, and one-tap invoice delivery over WhatsApp and SMS.
The screenshots through this section are taken directly from the running application.
Dashboard
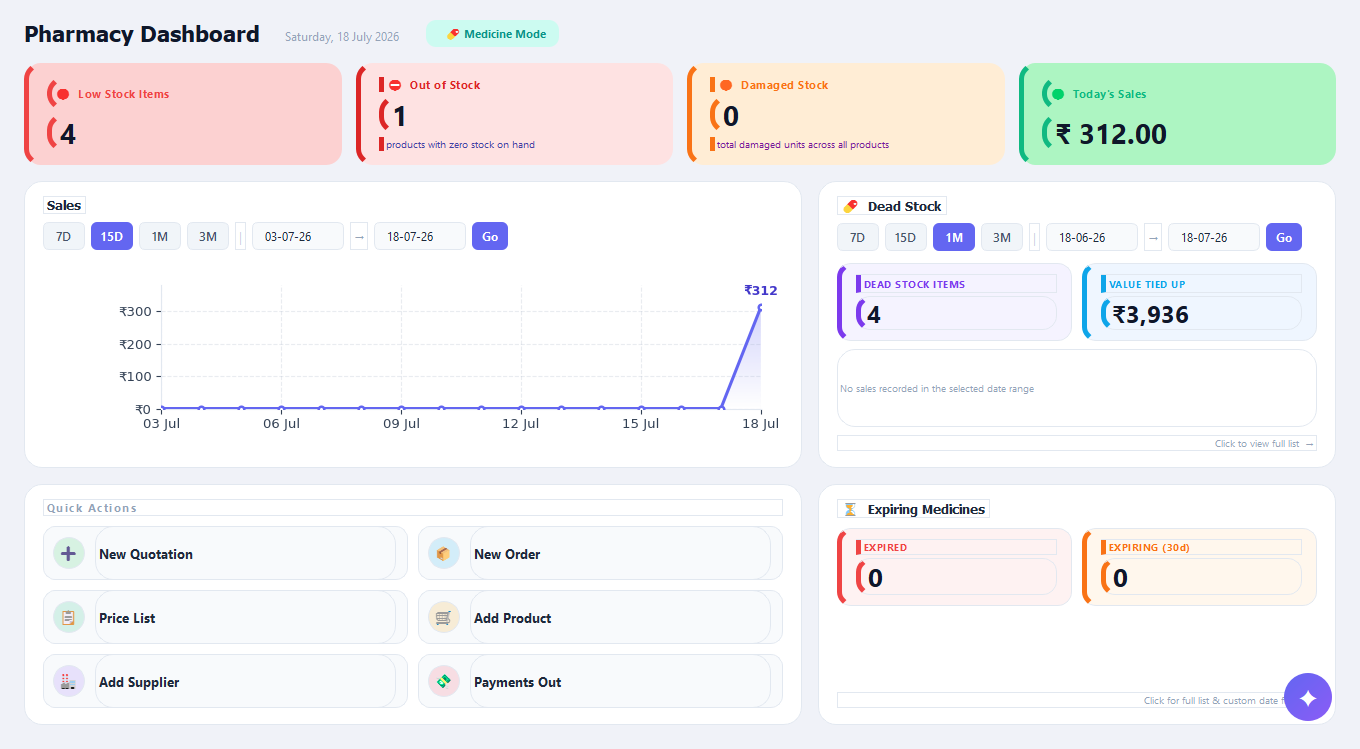
Everything that matters is visible the moment Automate opens.
- Live stat cards: Low Stock Items, Out of Stock, Damaged Stock, Today's Sales — updated in real time
- Sales trend chart with 7D / 15D / 1M / 3M quick ranges plus a custom from-to date picker
- Dead Stock panel — items with zero recent sales and the value tied up in them, for a chosen date range
- Expiring Medicines panel — separate counters for medicines already EXPIRED and those EXPIRING within 30 days
- Quick Actions panel — one-click shortcuts to New Quotation, New Order, Price List, Add Product, Add Supplier, Payments Out
Reading the dashboard
- Open Automate — the Dashboard loads automatically.
- Check the four stat cards at the top for anything needing attention (low stock, out of stock, damaged stock).
- Use the Sales panel's date-range buttons (or type a custom range and press Go) to review sales trends.
- Click "Click to view full list" under Dead Stock or Expiring Medicines to drill into the underlying items.
- Use a Quick Action button to jump straight into a common task.
Billing (Point of Sale)
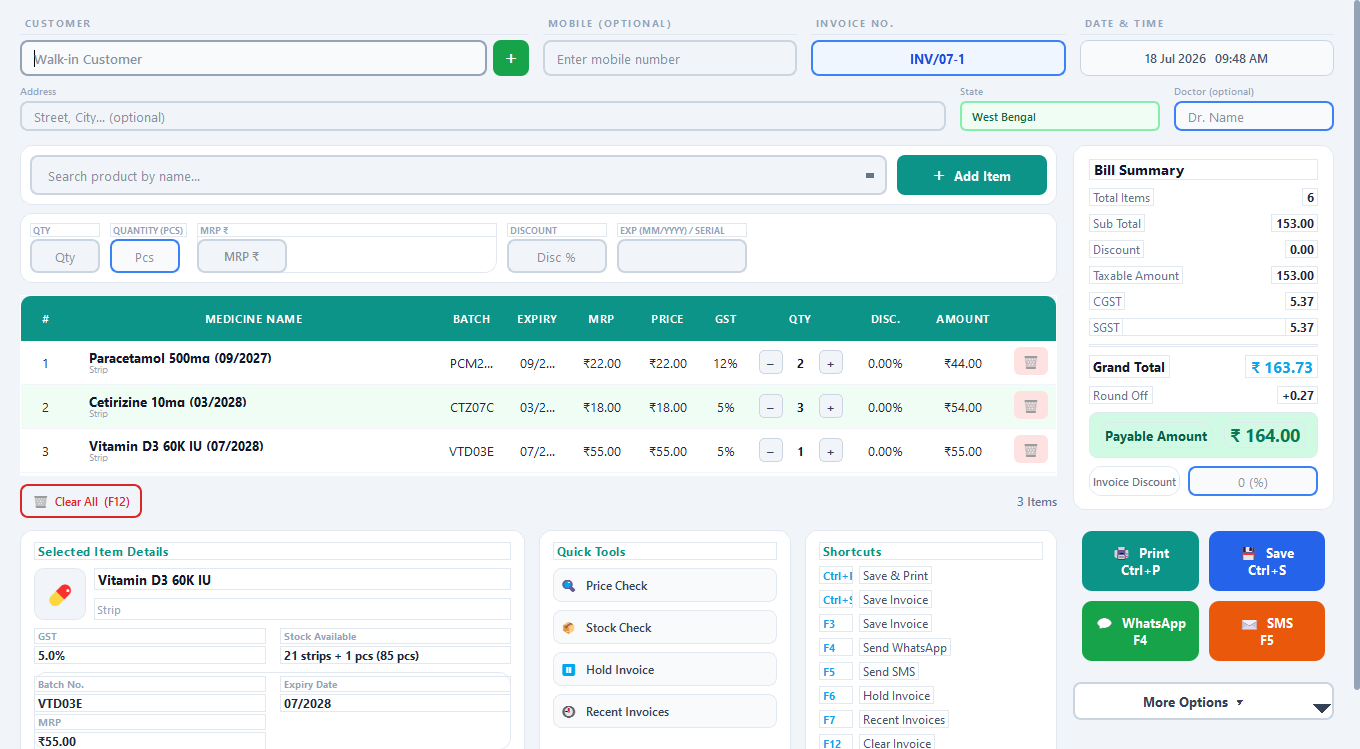
The core billing screen — fast, keyboard-first medicine billing.
- Product search auto-fills MRP, batch number, expiry date and GST from inventory (FEFO — First-Expiry-First-Out — ordering)
- Bills by strip or by loose piece for medicines with a strip count
- Live Bill Summary: item count, subtotal, discount, taxable amount, CGST/SGST split, grand total, round-off and payable amount
- Per-invoice discount field in addition to per-item discounts
- Customer fields: name, mobile, address, state, and an optional Doctor name field for prescription-linked sales
- Selected Item Details panel shows GST%, stock available (strips and pieces), batch number, expiry and MRP for the highlighted cart line
- Quick Tools: Price Check, Stock Check, Hold Invoice, Recent Invoices
- One-tap invoice delivery — Print, Save, WhatsApp and SMS — each with a dedicated function-key shortcut
- WhatsApp/SMS sends automatically attach the invoice PDF with a customisable "thank you + invoice total" message — nothing to type at send time
Keyboard shortcuts on the Billing screen
| Key | Action |
|---|---|
| Ctrl+P | Save & Print |
| Ctrl+S | Save Invoice |
| F3 | Save Invoice |
| F4 | Send via WhatsApp (auto-attaches PDF + message) |
| F5 | Send via SMS |
| F6 | Hold Invoice |
| F7 | Recent Invoices |
| F12 | Clear All (current cart) |
Billing a sale, step by step
- From the sidebar, press F1 or click "Billing" to open the billing screen.
- Enter the customer's name and mobile number (or leave blank for a walk-in sale).
- Type into "Search product by name…" and select the medicine — batch, expiry, MRP and GST fill in automatically.
- Enter the quantity (strips or pieces) and click "+ Add Item" (or press Enter).
- Repeat for each item in the sale.
- Apply a per-item discount (Disc %) or an overall Invoice Discount if needed.
- Review the Grand Total / Payable Amount in the Bill Summary panel.
- Close the sale with Ctrl+P (Save & Print), Ctrl+S/F3 (Save only), F4 (Save & send via WhatsApp automatically) or F5 (Save & send via SMS).
- Press F12 to clear the cart and start the next bill.
Purchase (Stock In)
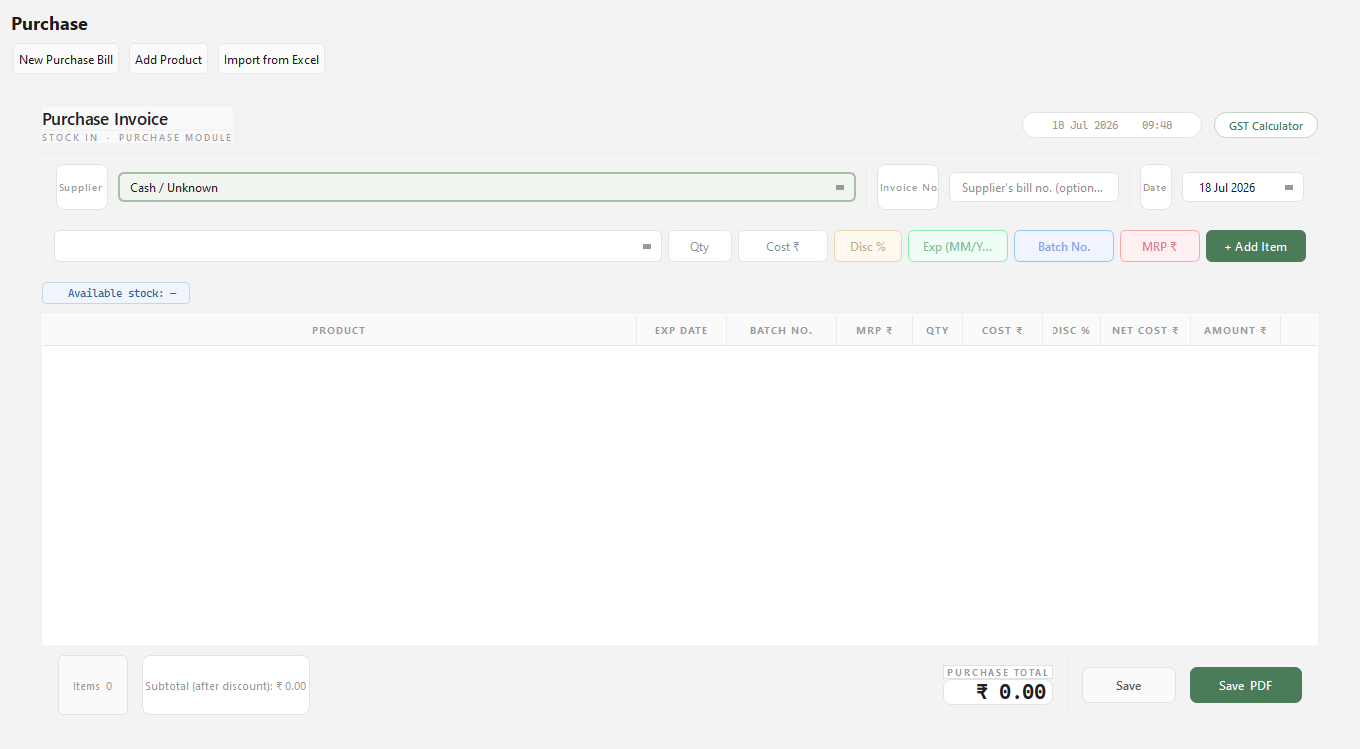
Recording a purchase updates cost price and stock for every line item instantly, and can carry the supplier's own invoice number and date.
- Supplier selection (or "Cash / Unknown" for undocumented purchases)
- Custom "Invoice No." field — record the supplier's own bill number alongside Automate's internal reference
- "Date" field with a calendar picker — backdate a purchase to match the supplier's paperwork; it still lands correctly in date-filtered reports
- Per-item entry: Qty, Cost, Discount %, Expiry (MM/YYYY), Batch No., MRP
- "Available stock" indicator for the selected product before adding
- "Add Product" tab — register a brand-new product without leaving the Purchase screen
- "Import from Excel" tab — bulk-load a purchase invoice from a spreadsheet instead of entering items one by one
- Save (record only) or Save PDF (record + generate a printable purchase invoice)
Recording a purchase, step by step
- Open "Purchase" from the sidebar (or press F2).
- Choose the Supplier from the dropdown.
- Optionally enter the supplier's own Invoice No. and adjust the Date if the purchase should be backdated.
- Search for each product, enter Qty, Cost, Discount, Expiry, Batch No. and MRP, then click "+ Add Item".
- Repeat for every item on the supplier's bill.
- Click "Save" to record the purchase (updates stock and cost price immediately), or "Save PDF" to also generate a printable purchase invoice.
- For bulk purchases, use "Import from Excel" instead of manual entry.
Inventory
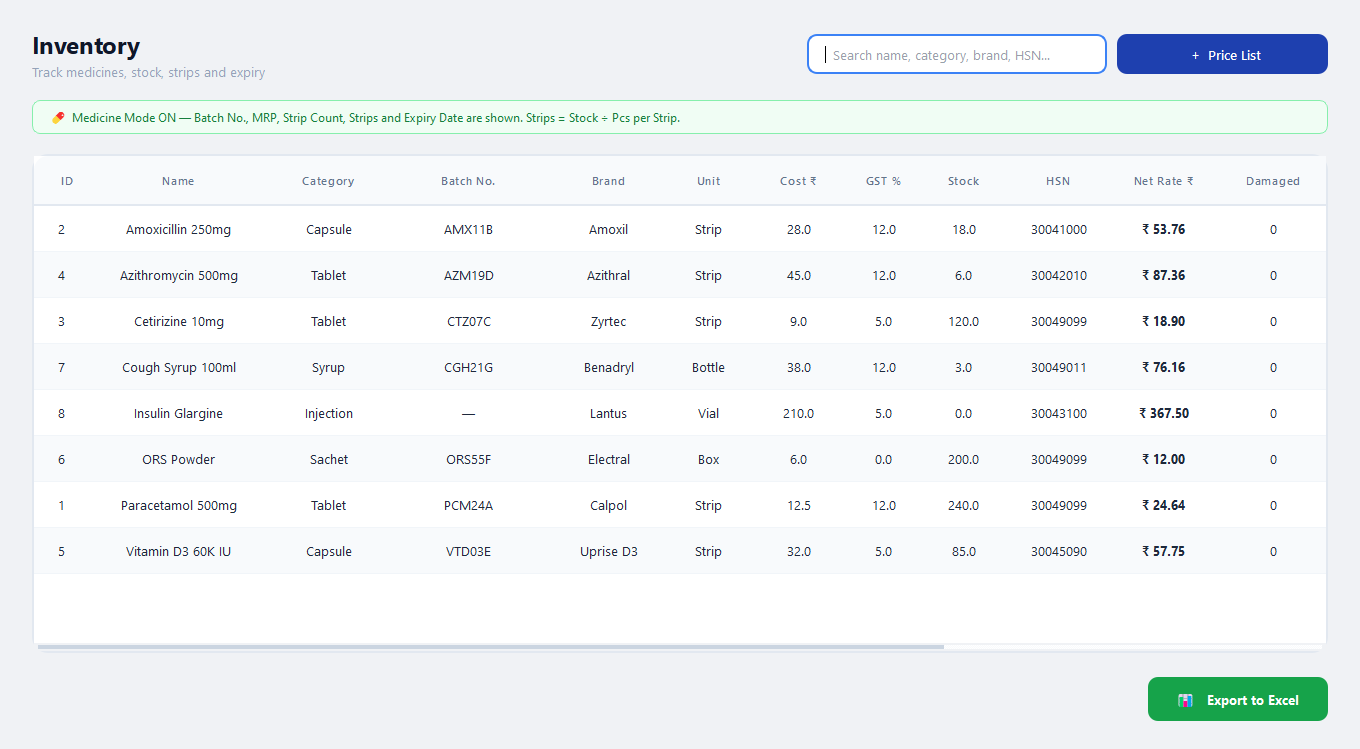
Stock tracked by batch and expiry, not just a single running total.
- Per-product table: Category, Batch No., Brand, Unit, Cost, GST %, Stock, HSN code, Net Rate (cost + GST, auto-calculated), Damaged units
- Search across name, category, brand or HSN code
- "Medicine Mode" banner clarifies that Batch No., MRP, Strip Count and Expiry Date are tracked per product, and "Strips" shown = full strips + loose pieces
- One-click "Export to Excel" for stock audits or accountant handoff
- "+ Price List" button to generate a customer-facing price list
Checking or updating stock
- Open "Inventory" from the sidebar.
- Use the search box to find a specific medicine by name, category, brand or HSN code.
- Review Stock, Net Rate and Damaged columns for that product.
- Click "Export to Excel" to save the full stock list for reporting or audit purposes.
- New stock is added automatically whenever a Purchase Invoice is saved — Inventory doesn't need manual edits for routine stock-ins.
Customers
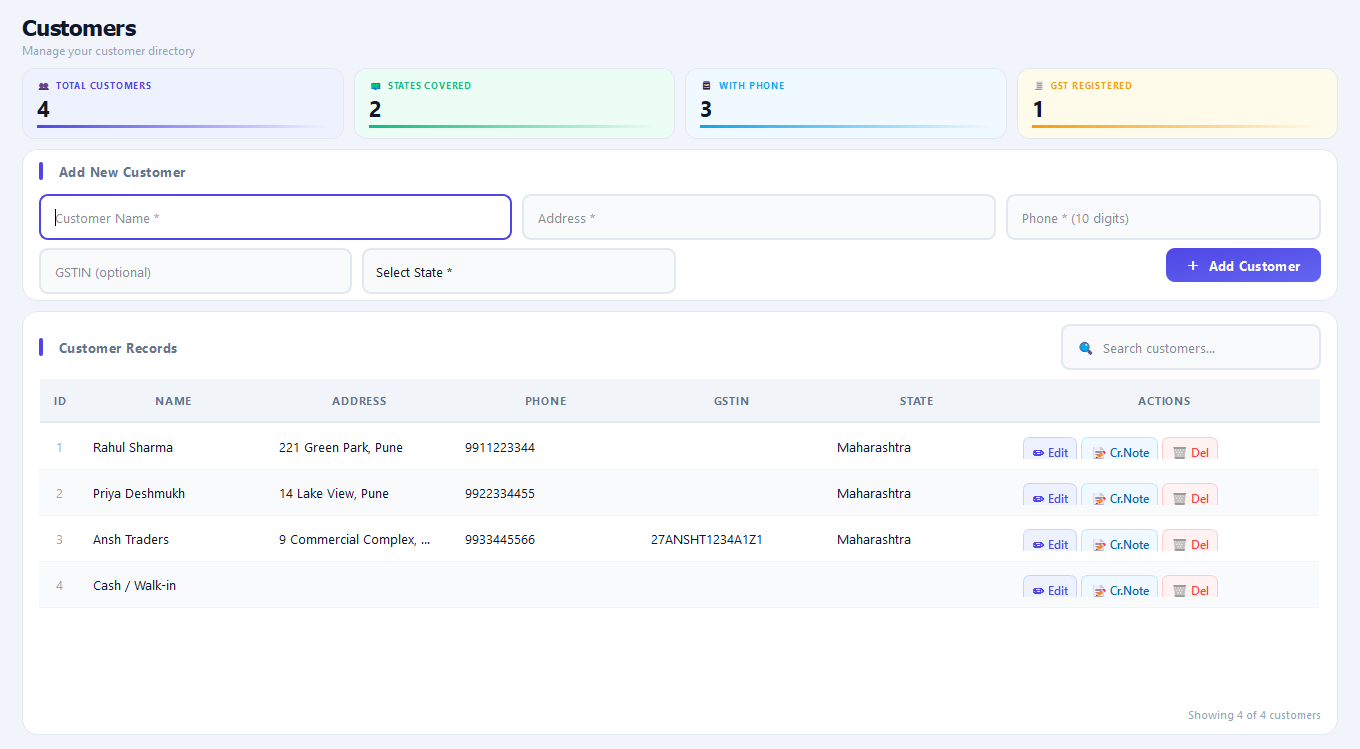
A customer directory built for repeat pharmacy sales and GST-compliant billing.
- Summary cards: Total Customers, States Covered, With Phone, GST Registered
- Quick add-customer form: Name, Address, Phone, GSTIN (optional), State
- Searchable customer table with Edit, Cr. Note (credit note) and Delete actions per row
- Customer's State field feeds directly into CGST/SGST vs. IGST calculation during billing
Adding a customer
- Open "Customer" from the sidebar.
- Fill in Customer Name, Address and Phone (required); GSTIN is optional.
- Select the customer's State.
- Click "+ Add Customer".
- Use the search box above the table to find any customer later, or use Edit / Cr. Note / Del for record maintenance.
Suppliers
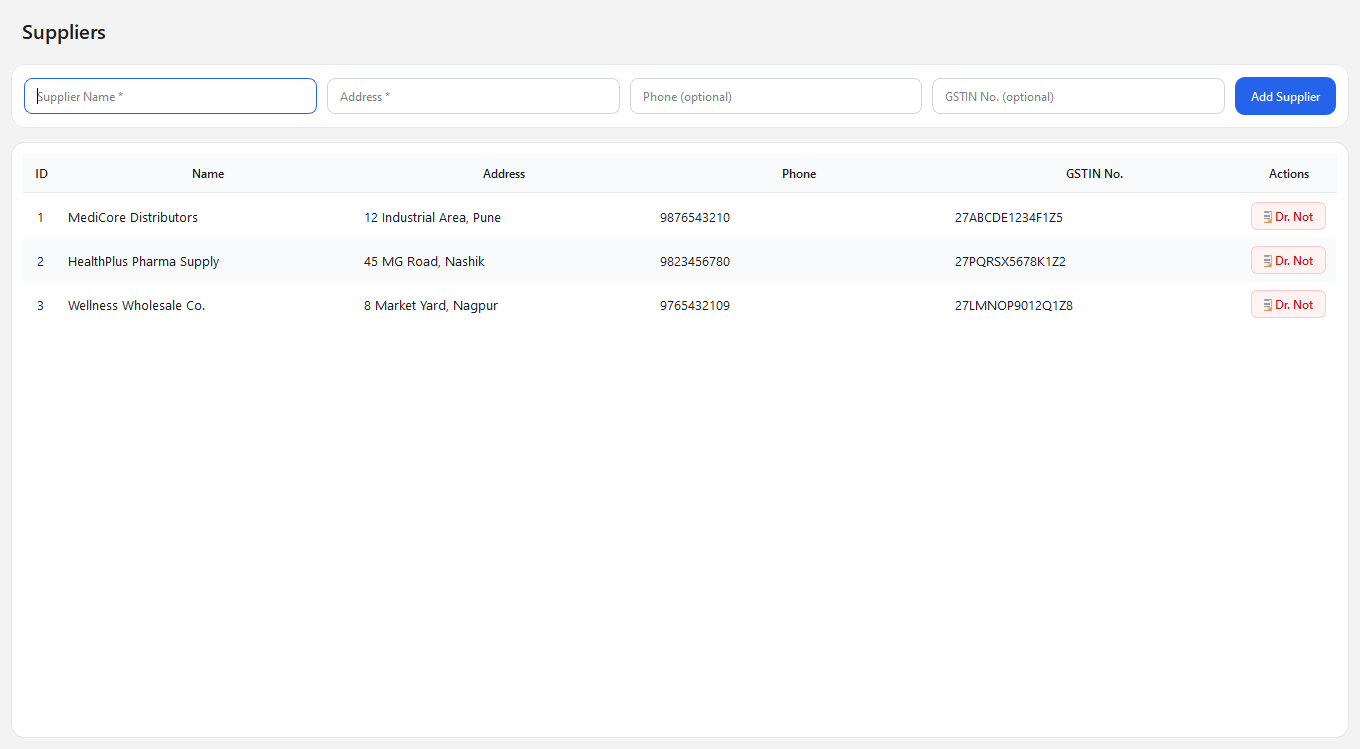
Every vendor you buy from, with GSTIN and dues tracked in one place.
- Quick add-supplier form: Name, Address, Phone (optional), GSTIN (optional)
- Supplier table feeds the Supplier dropdown on every Purchase Invoice
- "Dr. Note" (debit note) action per supplier for purchase returns or price corrections
Adding a supplier
- Open "Supplier" from the sidebar.
- Fill in Supplier Name and Address (required); Phone and GSTIN are optional.
- Click "Add Supplier".
- The new supplier is immediately available in the Purchase screen's Supplier dropdown.
Credit Book (Payments In)
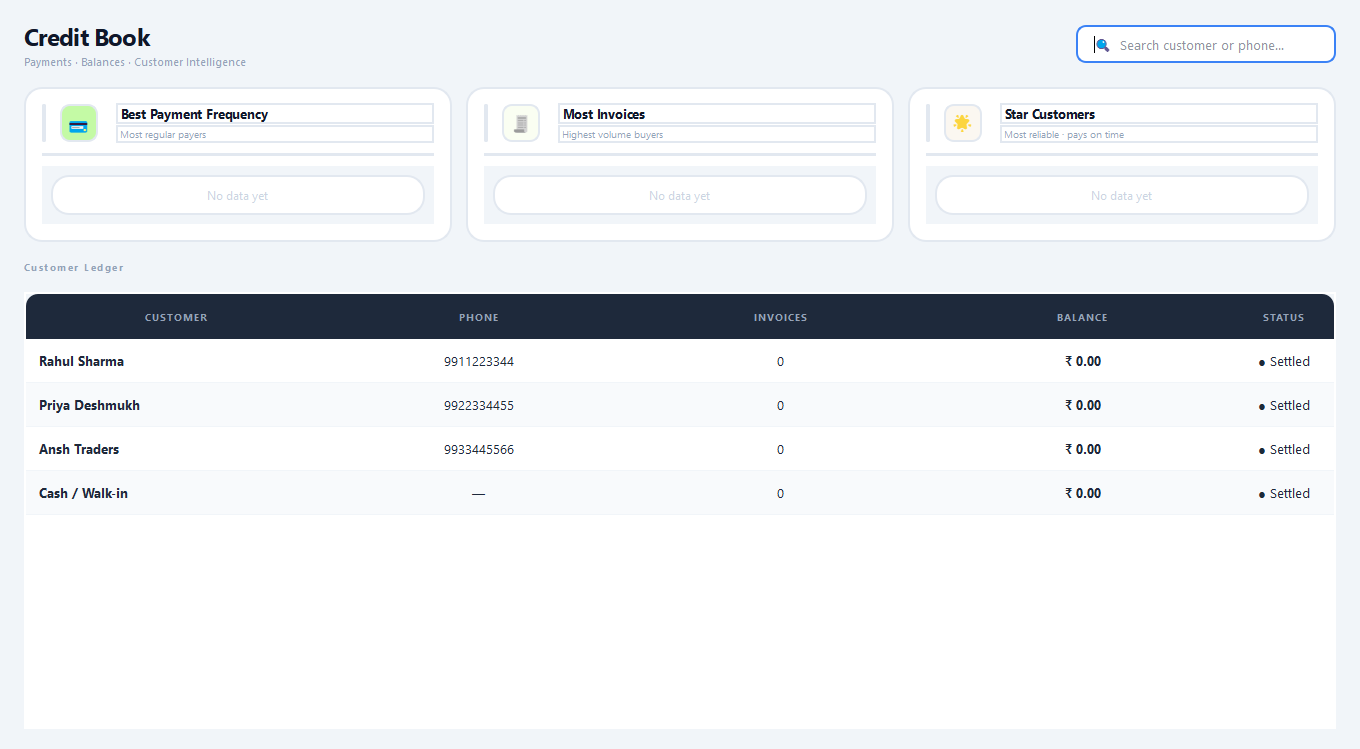
Customer-side ledger — balances, payment history and simple customer intelligence in one screen.
- Customer Ledger table: Customer, Phone, Invoices, Balance, Status (Settled / Due)
- Insight panels: Best Payment Frequency, Most Invoices, Star Customers
- Search by customer name or phone number
Using the Credit Book
- Open "Payments In" (Credit Book) from the sidebar.
- Use the search box to find a specific customer.
- Check the Balance and Status columns to see who owes money.
- Review the insight panels to identify your most reliable, highest-volume customers.
Payment Out
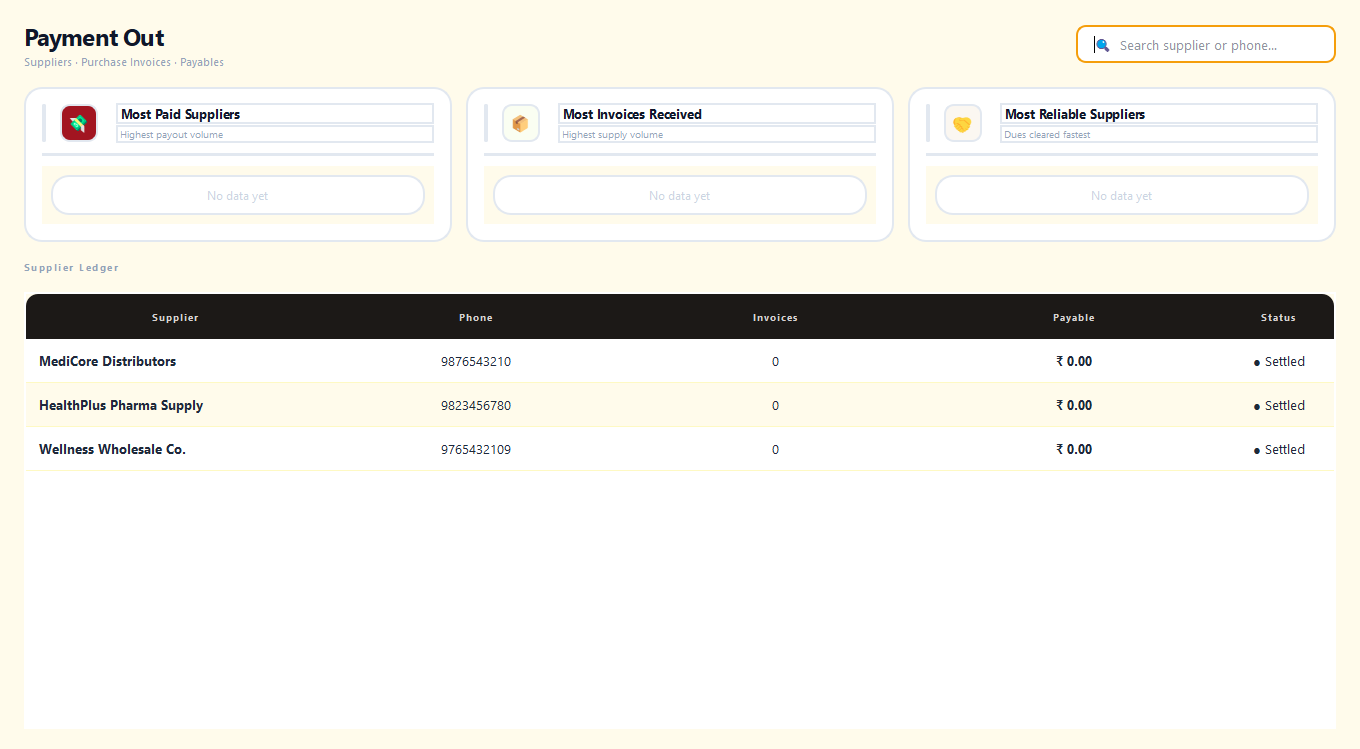
Supplier-side ledger — what you owe, to whom, and how reliably it gets paid.
- Supplier Ledger table: Supplier, Phone, Invoices, Payable, Status
- Insight panels: Most Paid Suppliers, Most Invoices Received, Most Reliable Suppliers
- Search by supplier name or phone number
Using Payment Out
- Open "Payments Out" from the sidebar.
- Use the search box to find a specific supplier.
- Check the Payable and Status columns to see outstanding dues.
- Use the insight panels when deciding which suppliers to prioritise paying.
Reports
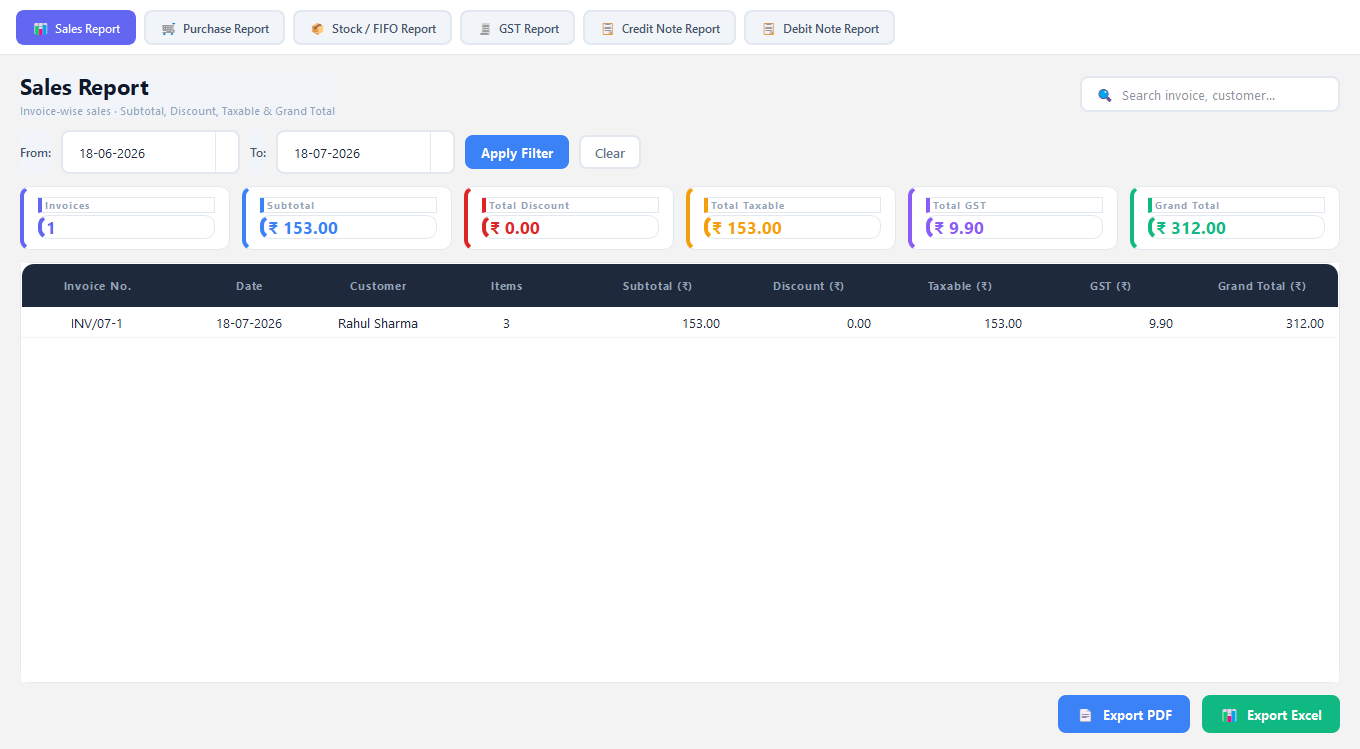
Six report types in one screen, each with its own date filter and export.
- Sales Report — invoice-wise Subtotal, Discount, Taxable and Grand Total, searchable by invoice or customer
- Purchase Report — the purchase-side equivalent of the Sales Report
- Stock / FIFO Report — stock valuation using First-In-First-Out costing
- GST Report — consolidated GST figures for return filing
- Credit Note Report / Debit Note Report — returns and adjustments issued to customers or suppliers
Every report includes a From/To date filter with Apply Filter and Clear, summary cards, and Export to PDF / Export to Excel buttons.
Generating a report
- Open "Reports" from the sidebar.
- Choose the report tab you need (Sales, Purchase, Stock/FIFO, GST, Credit Note or Debit Note).
- Set the From/To date range and click "Apply Filter".
- Review the summary cards and the detailed table below them.
- Click "Export PDF" or "Export Excel" to save the report.
Sales Invoices (Invoice History)
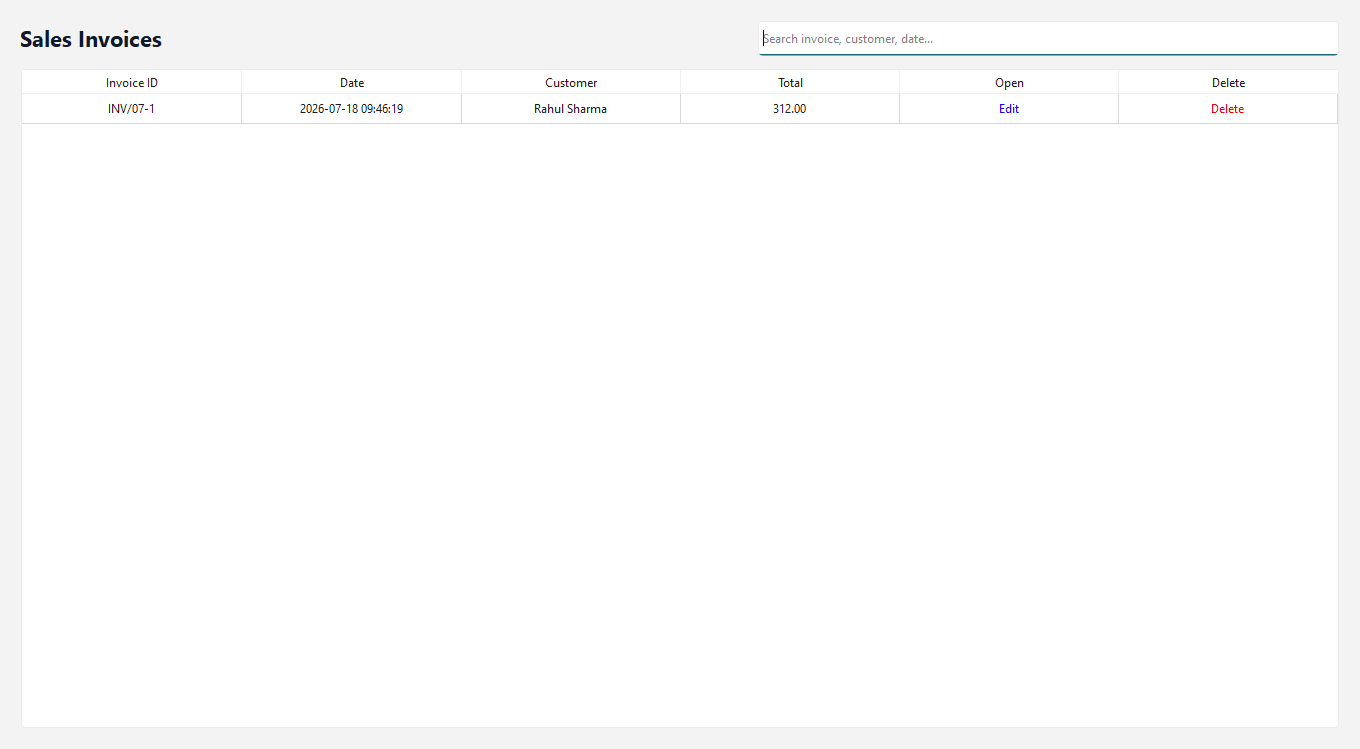
Full sales history, searchable in seconds.
- Table of every saved invoice: Invoice ID, Date, Customer, Total
- Search across invoice number, customer name or date
- "Edit" to reopen an invoice; "Delete" to remove one made in error
Finding an invoice
- Open "Invoices" from the sidebar.
- Use the search box to find an invoice by number, customer or date.
- Click "Edit" to reopen and review/reprint it, or "Delete" to remove it (with confirmation).
Profit Analysis
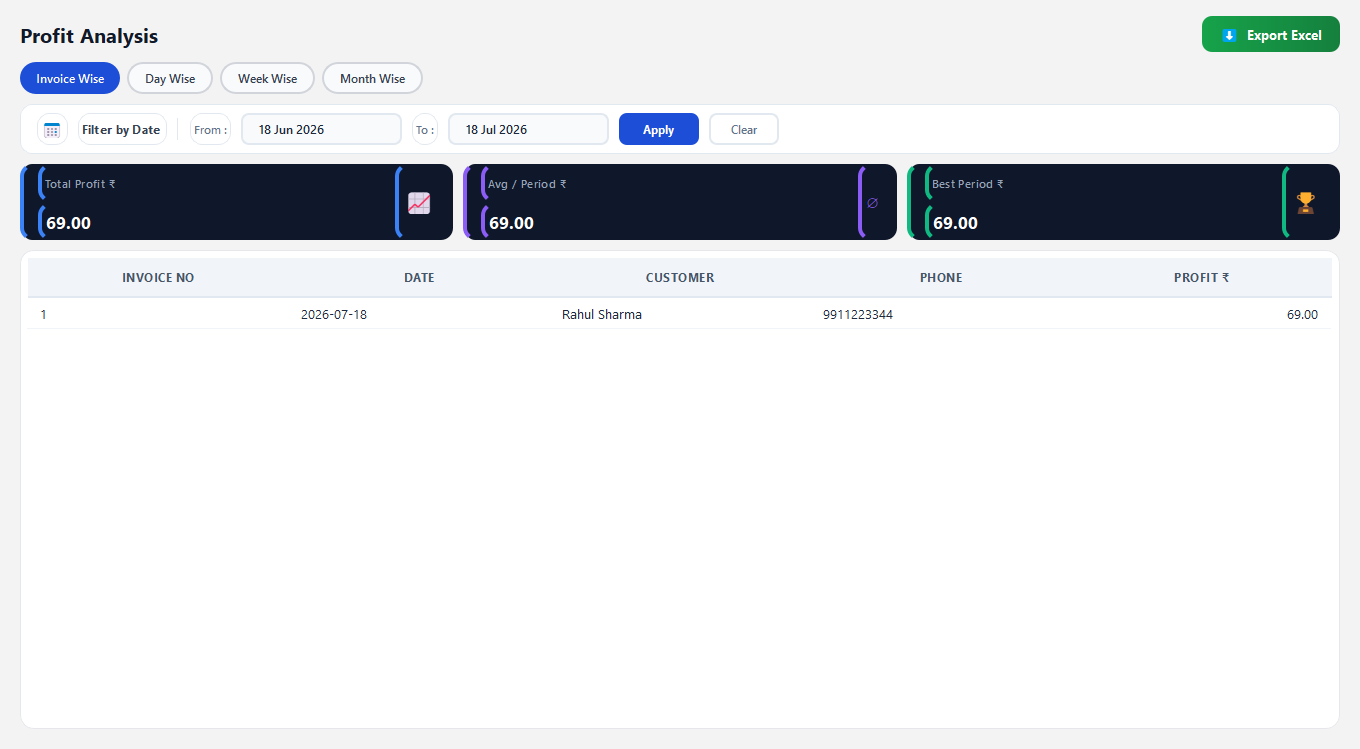
Real margin tracking — cost vs. selling price — not just revenue.
- Four views: Invoice Wise, Day Wise, Week Wise, Month Wise
- Summary cards: Total Profit, Avg / Period, Best Period
- Per-row detail: Invoice No., Date, Customer, Phone, Profit
- "Export Excel" for accounting handoff
Reviewing profit
- Open "Profit" from the sidebar.
- Choose a view — Invoice Wise, Day Wise, Week Wise or Month Wise.
- Set a date range and click "Apply".
- Review Total Profit, Avg/Period and Best Period at the top, and the detailed breakdown below.
- Click "Export Excel" to save the analysis.
Business Calculator (GST Calculator)
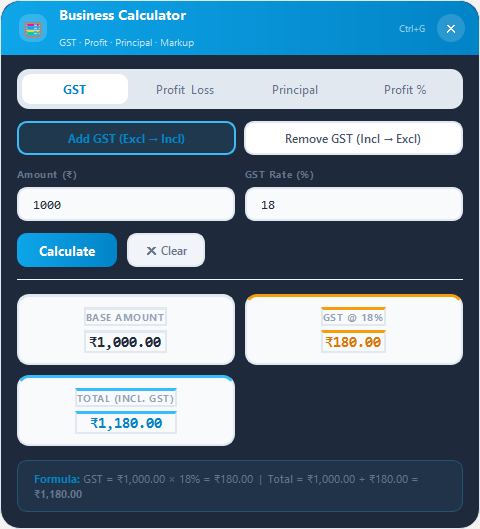
A floating, always-on-top calculator — one shortcut away from any screen.
- GST tab — Add GST (Excl → Incl) or Remove GST (Incl → Excl) on any amount, at any GST rate
- Profit & Loss tab — cost price, selling price and quantity in; total cost, revenue, profit/loss and margin % out
- Principal tab — Simple Interest, Compound Interest, and Reverse (solve for principal from a known total)
- Profit % tab — solve for Profit %, Selling Price, or Cost Price from the other two values
- Every calculation shows its formula inline, not just the answer
- Draggable, frameless floating window; toggle with Ctrl+G from anywhere in Automate
Using the calculator
- Press Ctrl+G from any screen to open the calculator (press again to close).
- Choose a tab: GST, Profit & Loss, Principal, or Profit %.
- Enter the known values and click "Calculate".
- Read the result cards and the formula line beneath them.
- Click "Clear" to reset the tab, or drag the header to reposition the panel.
Settings
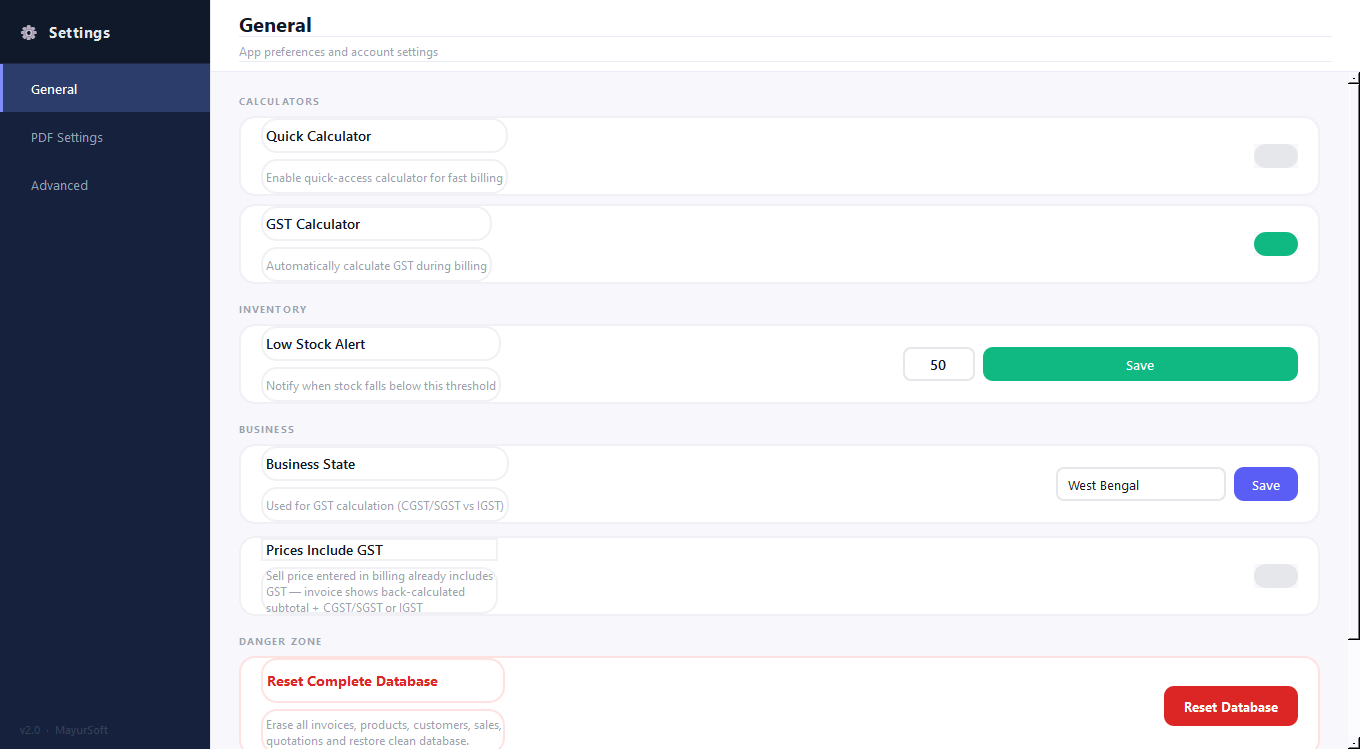
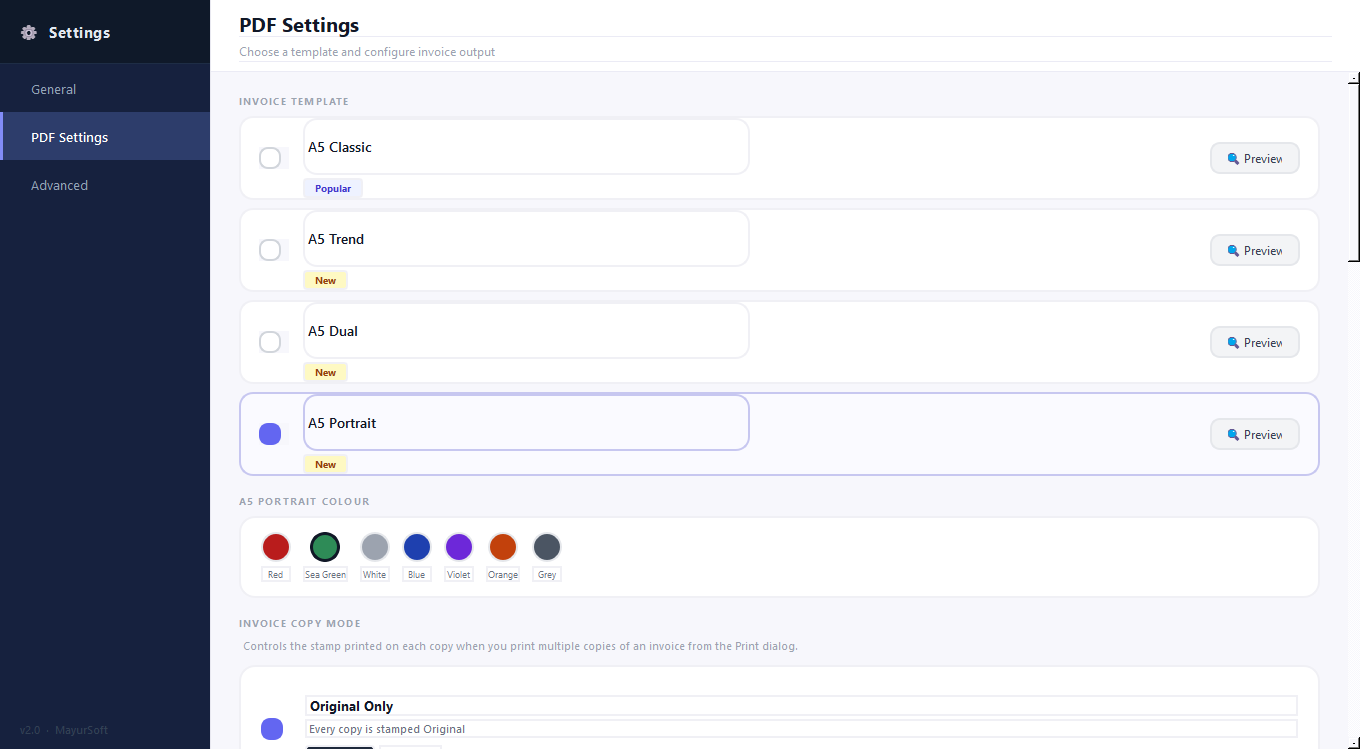
Business rules and invoice appearance, fully in your control.
General tab
- Quick Calculator / GST Calculator toggles
- Low Stock Alert threshold (used by the Dashboard's Low Stock counter)
- Business State (used for CGST/SGST vs. IGST determination)
- "Prices Include GST" toggle, for shops that price inclusive of tax
PDF Settings tab
- Four invoice templates: A5 Classic, A5 Trend, A5 Dual, and A5 Portrait (colour-customisable — Red, Sea Green, White, Blue, Violet, Orange, Grey)
- Live "Preview" button on every template — generates a real sample PDF with demo data in a zoomable preview dialog
- Invoice Copy Mode — Original Only / Original+Duplicate / Original+Duplicate+Triplicate stamping for multi-copy printing
- Customisable WhatsApp/SMS invoice message template — the same message used by the Billing screen's F4 and F5 shortcuts
Choosing an invoice template
- Open "Settings" from the sidebar, then the "PDF Settings" tab.
- Click "Preview" next to any template to see a live sample invoice PDF (zoom in/out with the +/- controls).
- Select the radio button next to the template you want to use.
- If using A5 Portrait, pick a colour from the swatches shown.
- Choose an Invoice Copy Mode if you print multiple copies per sale.
- All future invoices use the selected template and settings immediately — no restart required.
Customising the WhatsApp/SMS message
- In Settings → PDF Settings, scroll to the WhatsApp Message section.
- Edit the message template (placeholders for customer name, invoice number and total are supported).
- Save — the Billing screen's F4 and F5 buttons use this exact message going forward, sent automatically with the invoice.
GST Invoice PDF Output
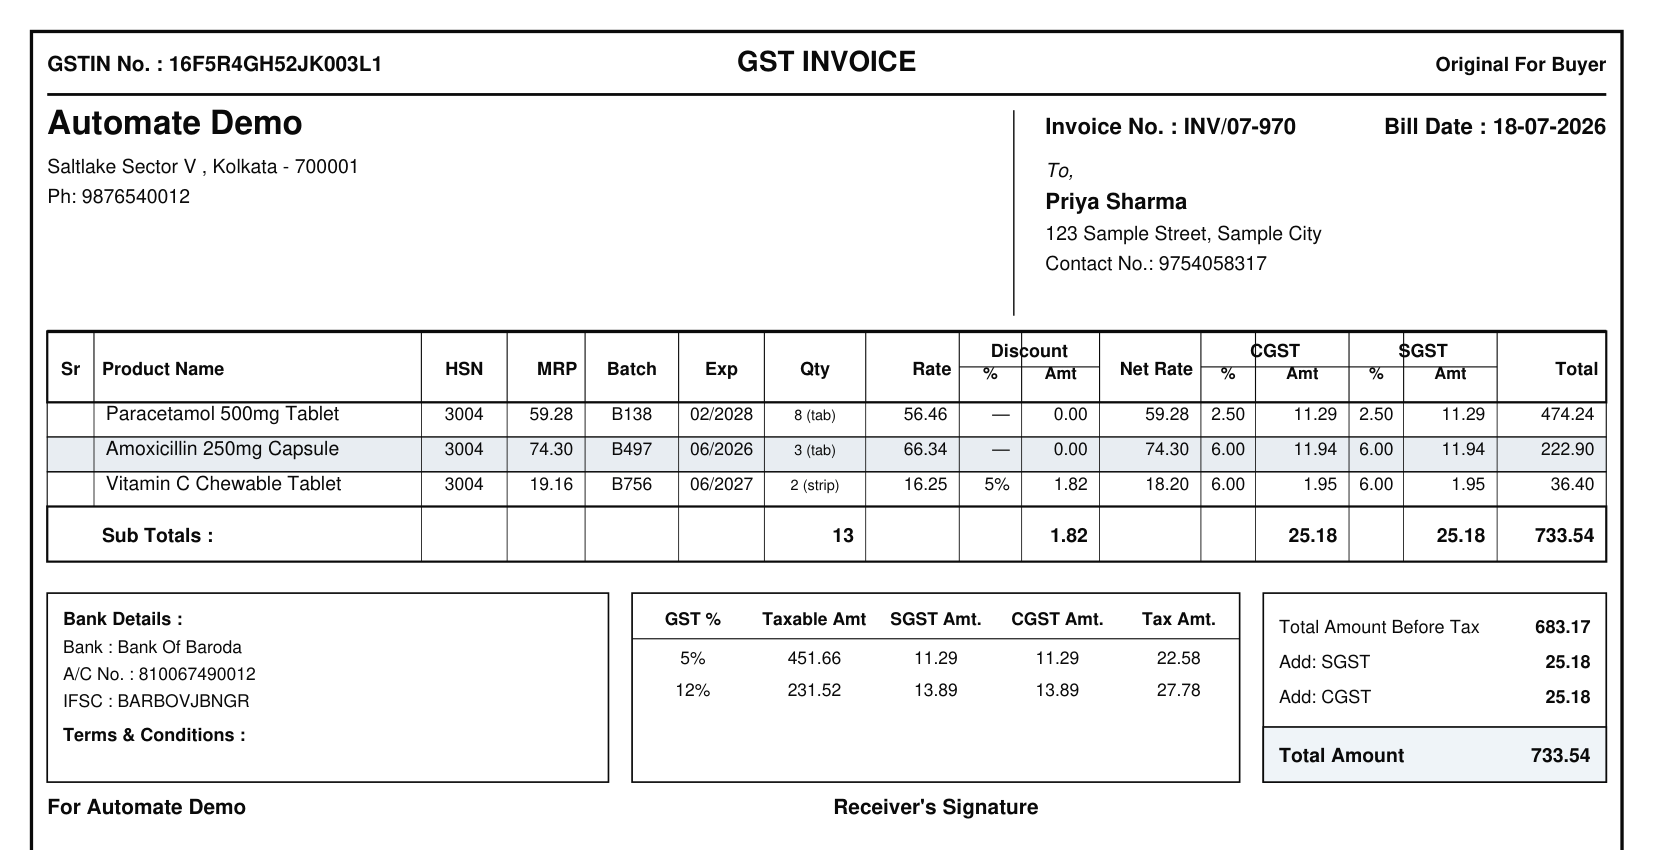
Every sale produces a clean, print-ready GST invoice automatically.
- Business name, address, phone and GSTIN
- Invoice number, bill date, and customer name, address and contact number
- Line items with HSN code, MRP, Batch No., Expiry, Qty, Rate, Discount, Net Rate, CGST/SGST % and amount, and line Total
- Subtotals row, GST-rate-wise tax breakup table, and a final Total Amount box (Before Tax, SGST, CGST, Total)
- Bank details block and a Terms & Conditions area
- "Original For Buyer" / "Duplicate" / "Triplicate" stamping, depending on the Invoice Copy Mode chosen in Settings
This is the exact PDF attached automatically when an invoice is sent via WhatsApp (F4) or referenced by SMS (F5) from the Billing screen.
Backup & Restore
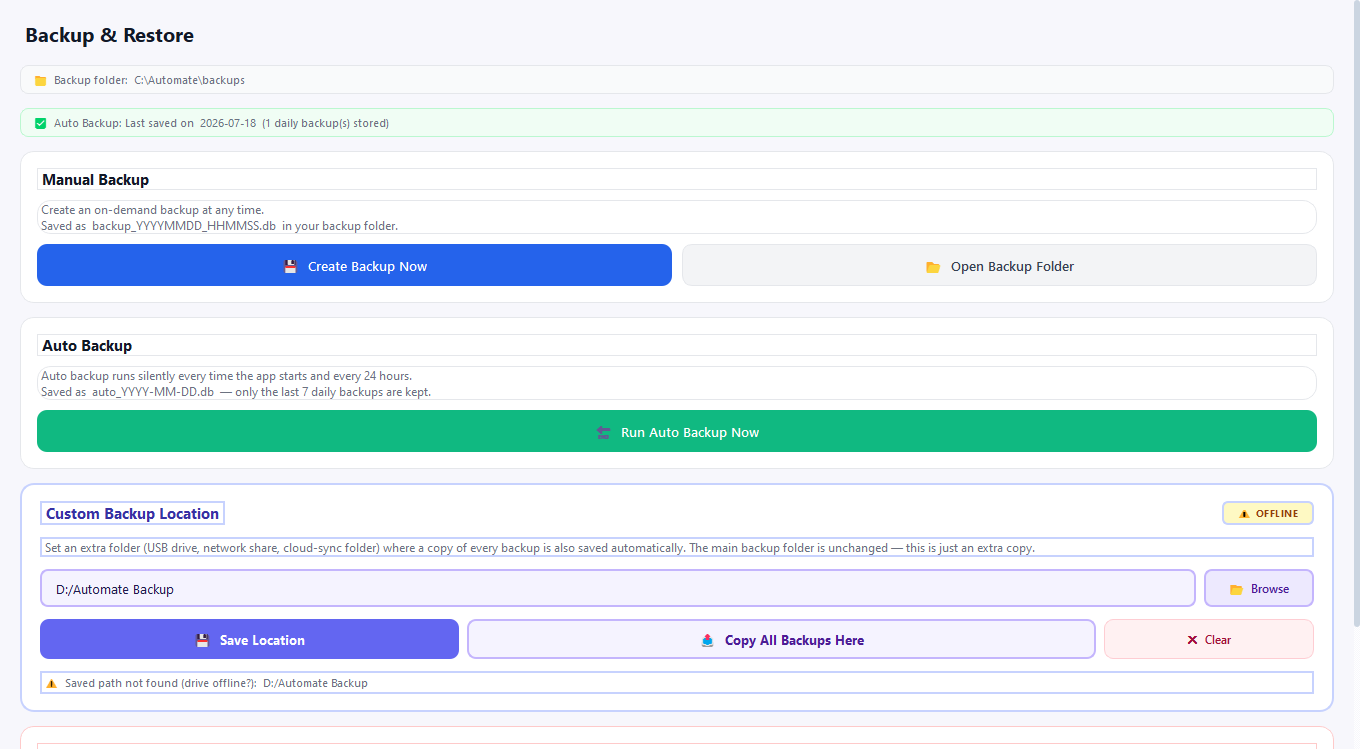
Your data, protected automatically — no manual routine required.
- Automatic backup on every app start and every 24 hours; the last 7 daily backups are always kept
- Manual "Create Backup Now" button for on-demand backups
- "Open Backup Folder" for direct file access
- "Run Auto Backup Now" to force an immediate automatic-style backup
- Optional Custom Backup Location — mirror every backup to a second folder (USB drive, network share, cloud-sync folder)
Backing up and restoring
- Open "Backup" from the sidebar.
- For a one-off backup, click "Create Backup Now".
- To also mirror backups elsewhere, enter or Browse to a folder under "Custom Backup Location", click "Save Location", then "Copy All Backups Here" to sync existing backups immediately.
- Automatic daily backups require no action — they run silently in the background.
Keyboard Shortcuts — Quick Reference
Sidebar navigation (from anywhere in the app)
| Key | Action |
|---|---|
| F1 | Go to Billing |
| F2 | Go to Purchase |
| F8 | Go to Settings |
| Ctrl+G | Toggle the floating Business/GST Calculator |
On the Billing screen
| Key | Action |
|---|---|
| Ctrl+P | Save & Print |
| Ctrl+S | Save Invoice |
| F3 | Save Invoice |
| F4 | Send invoice via WhatsApp (auto-attach + message + send) |
| F5 | Send invoice details via SMS |
| F6 | Hold current invoice |
| F7 | Recent Invoices |
| F12 | Clear the current cart |
About this edition — General & FMCG Billing
This is Automate's general-purpose billing engine, built for retail and FMCG shops rather than pharmacies. It skips medicine-specific tracking (batch numbers, expiry, strip/piece billing) in favour of straightforward product billing, MRP-based discounting, and customer credit management.
Under Settings, an FMCG Engine toggle turns on FMCG-specific billing behaviour inside this same install — so General and FMCG billing run from one application rather than two separate products.
Dashboard
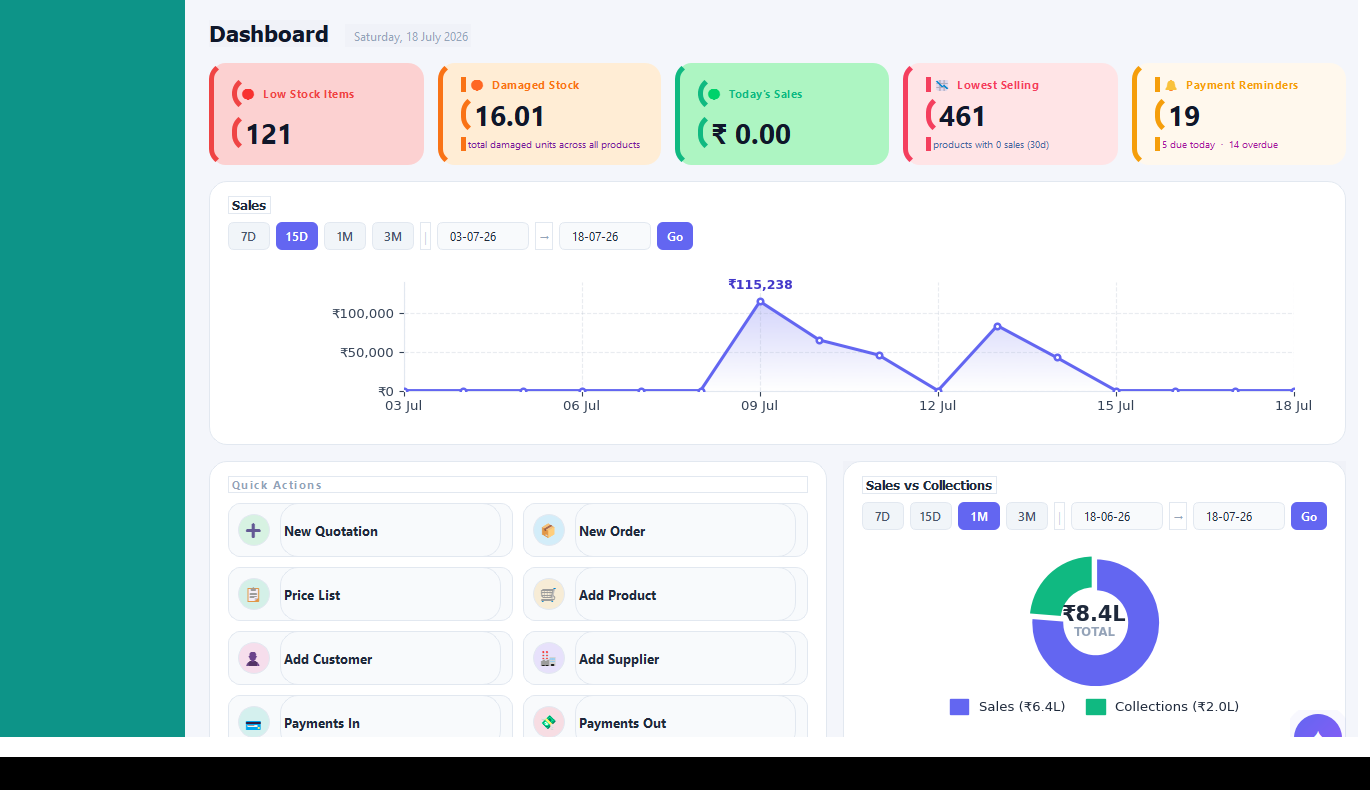
The at-a-glance view of the business the moment Automate opens.
- Live stat cards: Low Stock Items, Damaged Stock, Today's Sales, Lowest Selling (products with 0 sales in 30 days), Payment Reminders (due today / overdue)
- Sales trend chart with 7D / 15D / 1M / 3M quick ranges plus a custom from-to date picker
- Sales vs Collections donut chart, with its own date range and Go button
- Quick Actions panel — New Quotation, New Order, Price List, Add Product, Add Customer, Add Supplier, Payments In, Payments Out
Billing (Point of Sale)
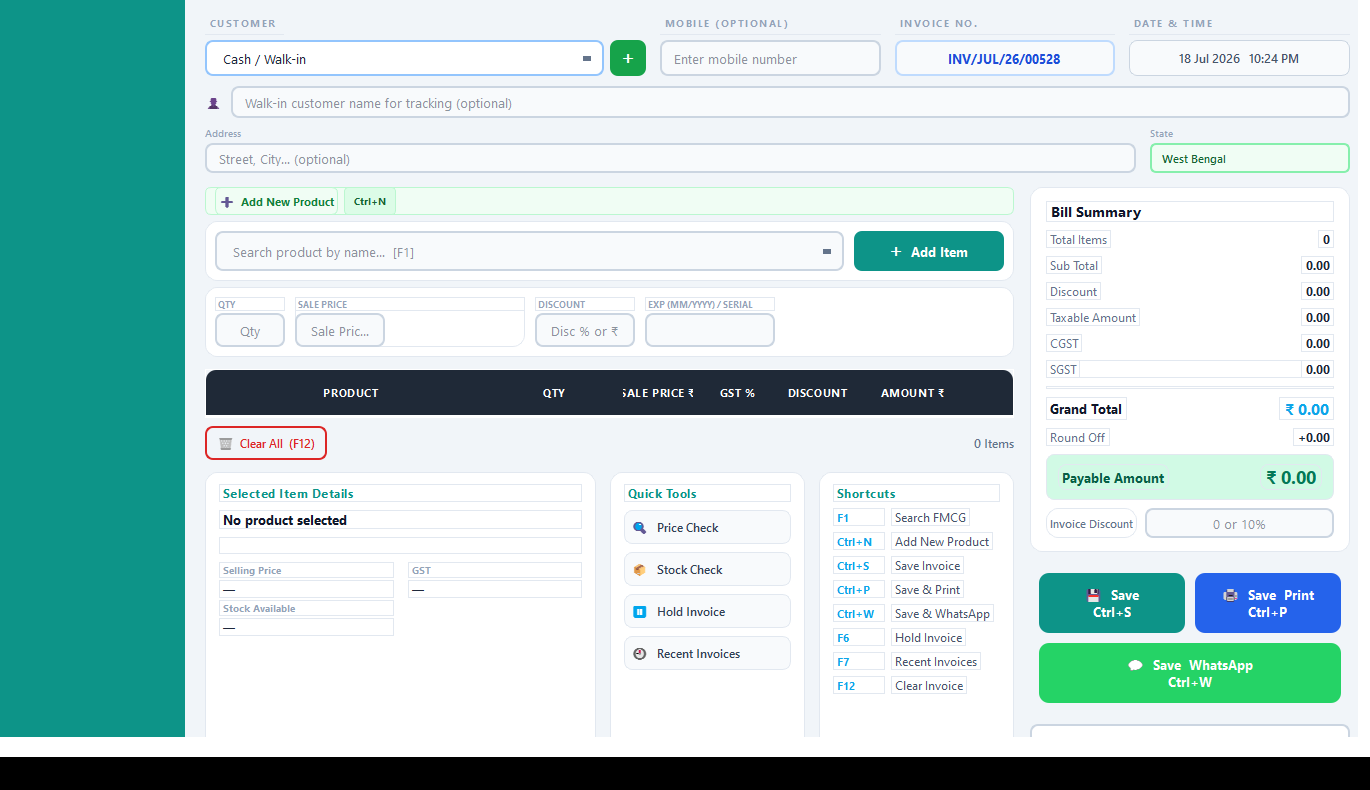
A straightforward, keyboard-first billing screen for general and FMCG products — no batch/expiry entry required.
- Customer field defaults to "Cash / Walk-in", with a quick "+" to add a new customer inline; optional mobile number, walk-in name, address and auto-detected State
- Auto-generated Invoice No. (e.g. INV/JUL/26/00528) and live date & time
- Product search auto-fills Sale Price, GST% and stock; an optional EXP (MM/YYYY) / Serial field covers products that need a date or serial reference
- Per-item Disc % (or ₹) plus an overall Invoice Discount (0 or 10% preset, or custom)
- Live Bill Summary: Total Items, Sub Total, Discount, Taxable Amount, CGST, SGST, Grand Total, Round Off, Payable Amount
- Selected Item Details panel: Selling Price, GST%, Stock Available for the highlighted cart line
- Quick Tools: Price Check, Stock Check, Hold Invoice, Recent Invoices
Keyboard shortcuts on the Billing screen
| Key | Action |
|---|---|
| F1 | Search product (FMCG) |
| Ctrl+N | Add New Product |
| Ctrl+S | Save Invoice |
| Ctrl+P | Save & Print |
| Ctrl+W | Save & send via WhatsApp |
| F6 | Hold Invoice |
| F7 | Recent Invoices |
| F12 | Clear Invoice |
Purchase (Stock In)
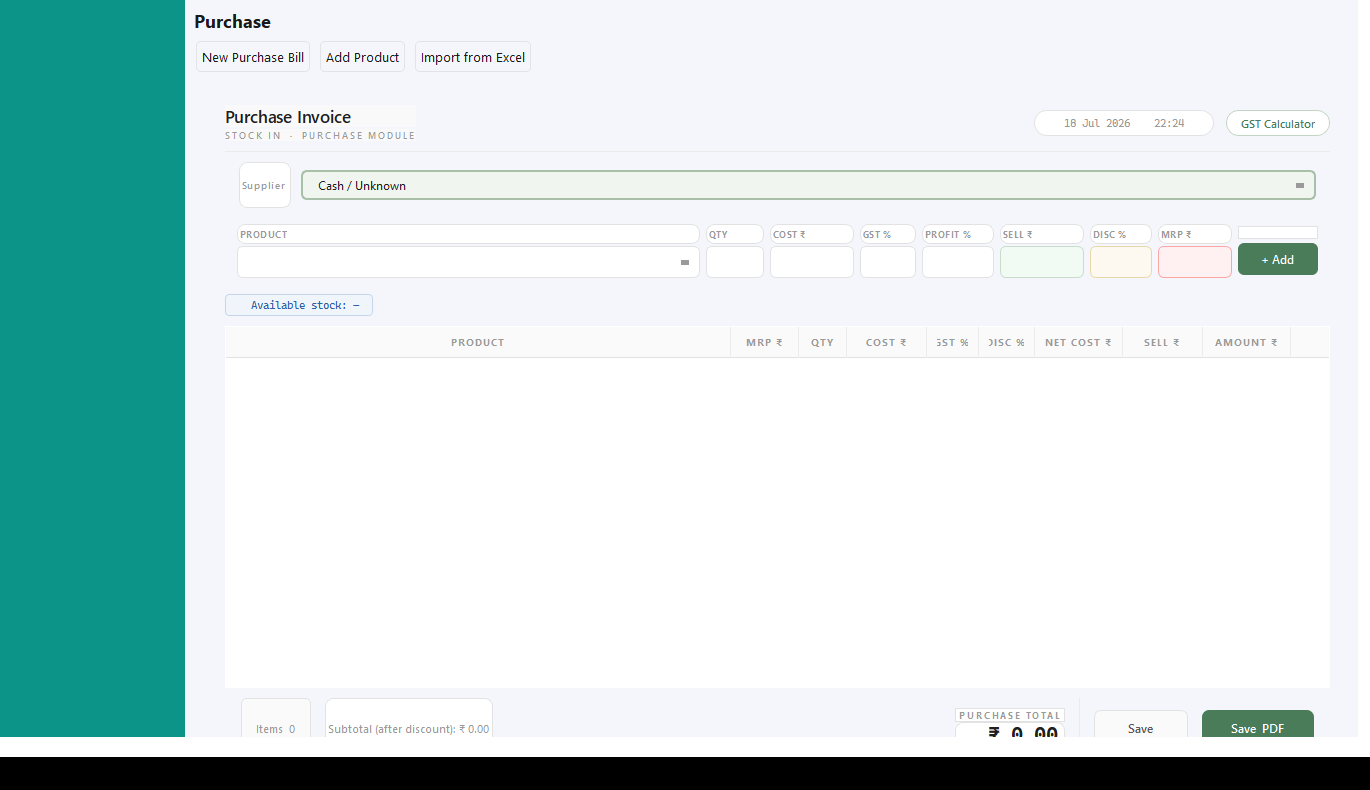
Recording a purchase updates stock and cost immediately, and can price items either from cost-up or from a target MRP.
- Supplier selection (or "Cash / Unknown"), with New Purchase Bill, Add Product and Import from Excel actions
- Per-item entry: Qty, Cost, GST%, Profit % — Sell price, Disc% and MRP are auto-calculated from these
- "Available stock" indicator for the selected product before adding
- A floating GST Calculator button is one click away while entering a purchase
- Line table: Product, MRP, Qty, Cost, GST%, Disc%, Net Cost, Sell, Amount
- Save (record only) or Save PDF (record + printable purchase invoice)
Inventory
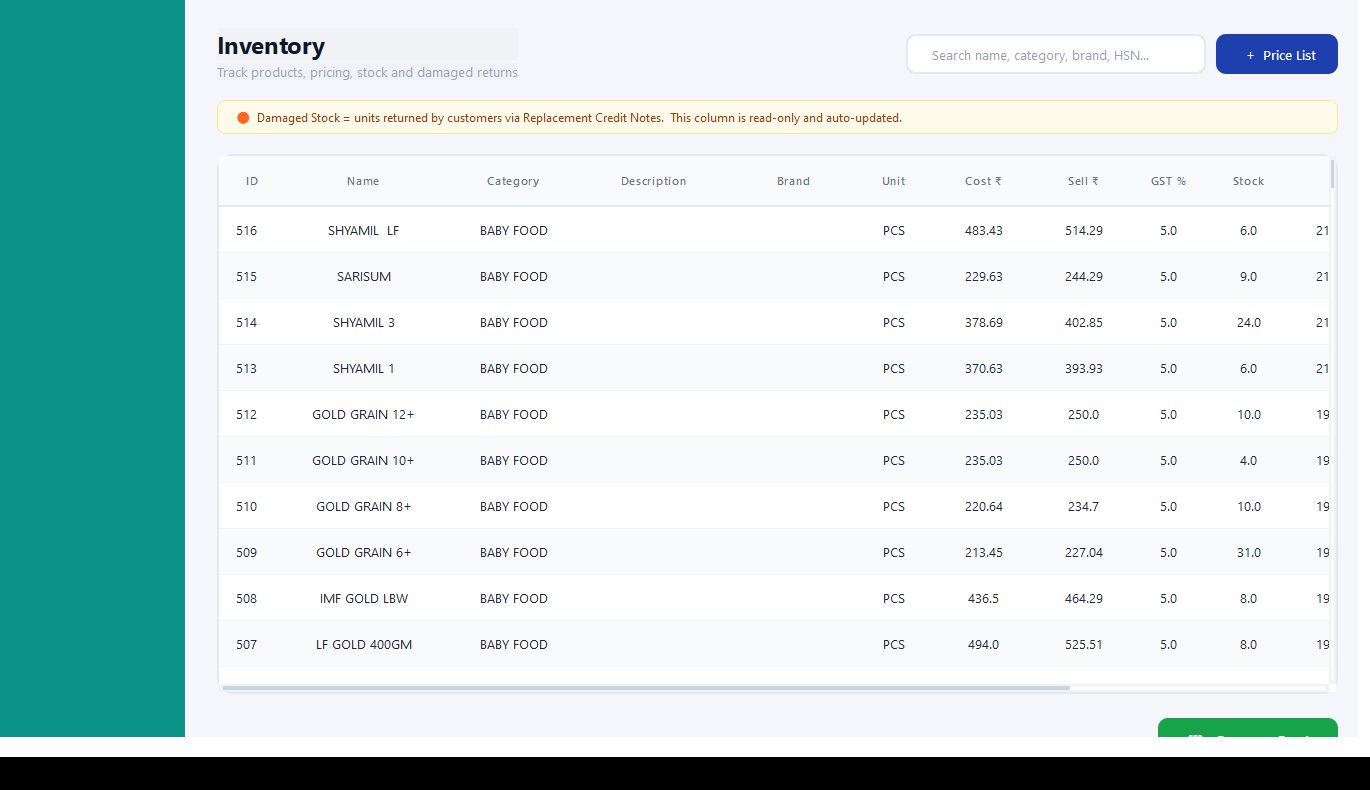
Track products, pricing, stock and damaged returns in one table.
- Per-product table: ID, Name, Category, Description, Brand, Unit, Cost, Sell, GST%, Stock, Damaged
- Search across name, category, brand or HSN code
- Damaged Stock is auto-updated from customer Replacement Credit Notes — it's a read-only column, not manually edited
- "+ Price List" button to generate a customer-facing price list
Customers
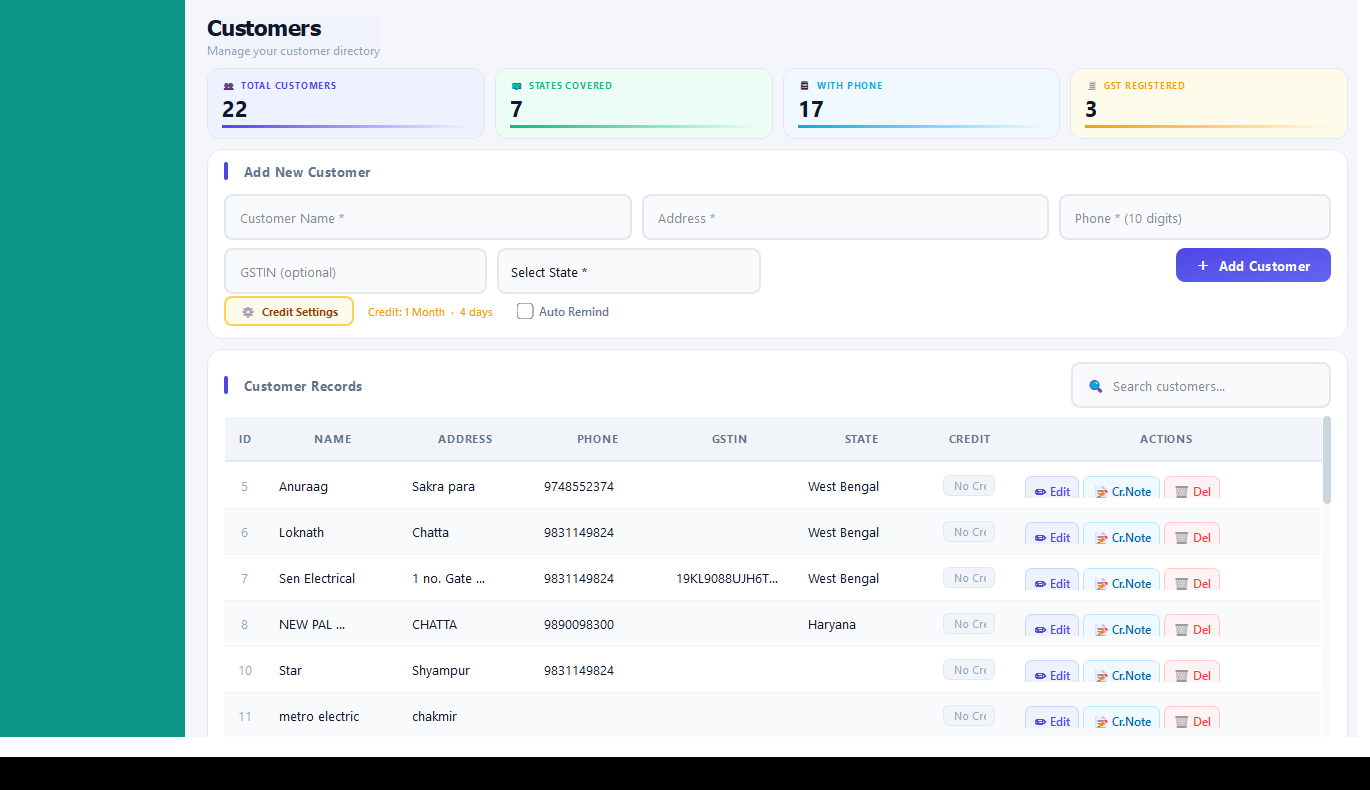
A customer directory with built-in credit terms and automatic payment reminders.
- Summary cards: Total Customers, States Covered, With Phone, GST Registered
- Quick add-customer form: Name, Address, Phone, GSTIN (optional), State
- Per-account Credit Settings — set a default credit period (e.g. "1 Month · 4 days") and an "Auto Remind" toggle to send reminders automatically as dues approach
- Searchable customer table with Edit, Cr. Note and Delete actions per row
Suppliers
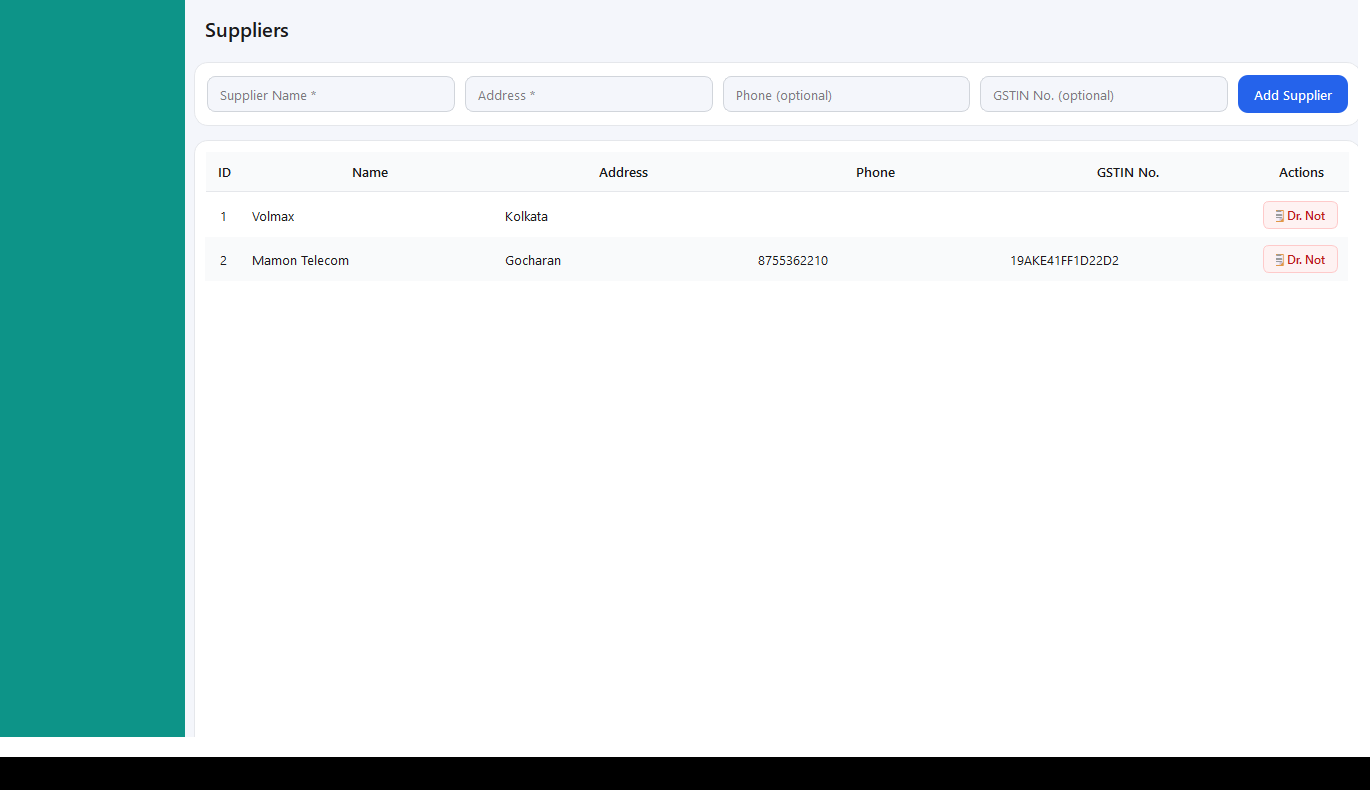
Every vendor you buy from, with GSTIN tracked in one place.
- Quick add-supplier form: Name, Address, Phone (optional), GSTIN (optional)
- Supplier table feeds the Supplier dropdown on every Purchase Invoice
- "Dr. Note" (debit note) action per supplier for purchase returns or price corrections
Credit Book (Payments In)
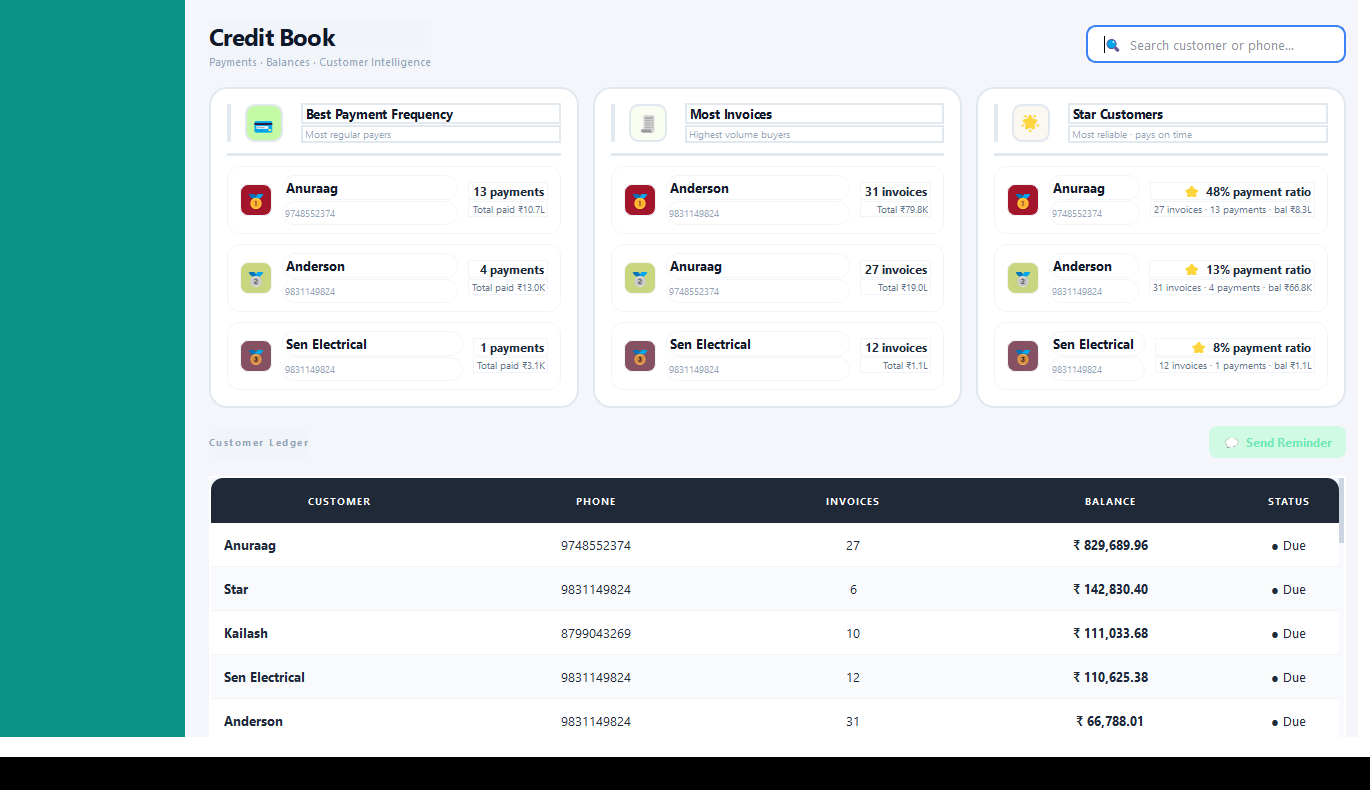
Customer-side ledger with a one-click way to nudge customers who owe money.
- Insight panels: Best Payment Frequency (most regular payers), Most Invoices (highest volume buyers), Star Customers (most reliable, with a payment ratio %)
- Customer Ledger table: Customer, Phone, Invoices, Balance, Status
- "Send Reminder" button to message customers with outstanding balances directly from the ledger
- Search by customer name or phone number
Payment Out
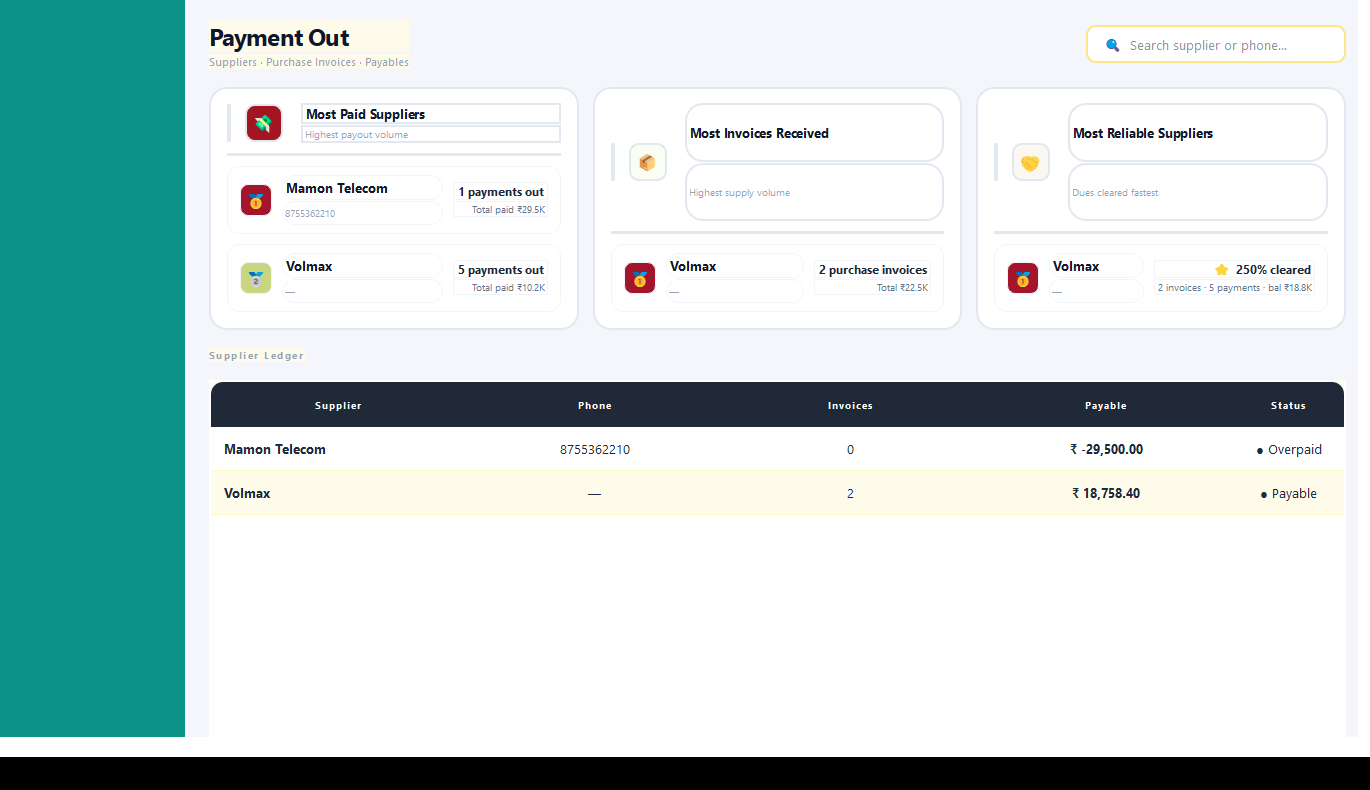
Supplier-side ledger — what you owe, to whom, and how reliably it gets paid.
- Insight panels: Most Paid Suppliers, Most Invoices Received, Most Reliable Suppliers (% of dues cleared)
- Supplier Ledger table: Supplier, Phone, Invoices, Payable, Status (Payable / Overpaid)
- Search by supplier name or phone number
Reports
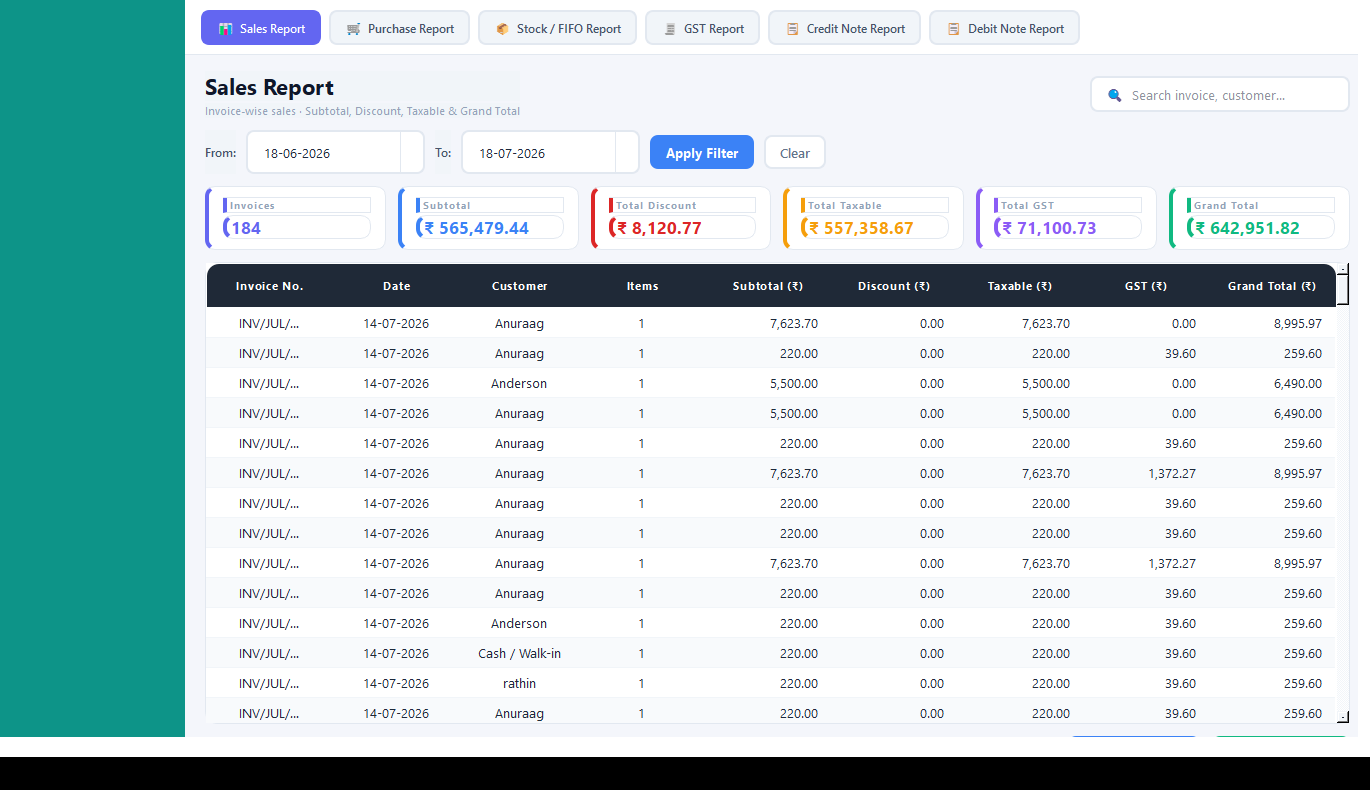
Six report types in one screen, each with its own date filter and export.
- Sales Report, Purchase Report, Stock/FIFO Report, GST Report, Credit Note Report, Debit Note Report
- From/To date filter with Apply Filter and Clear on every tab
- Summary cards — on Sales Report: Invoices, Subtotal, Total Discount, Total Taxable, Total GST, Grand Total
- Detailed invoice-wise table beneath the summary cards, searchable by invoice or customer
Sales Invoices
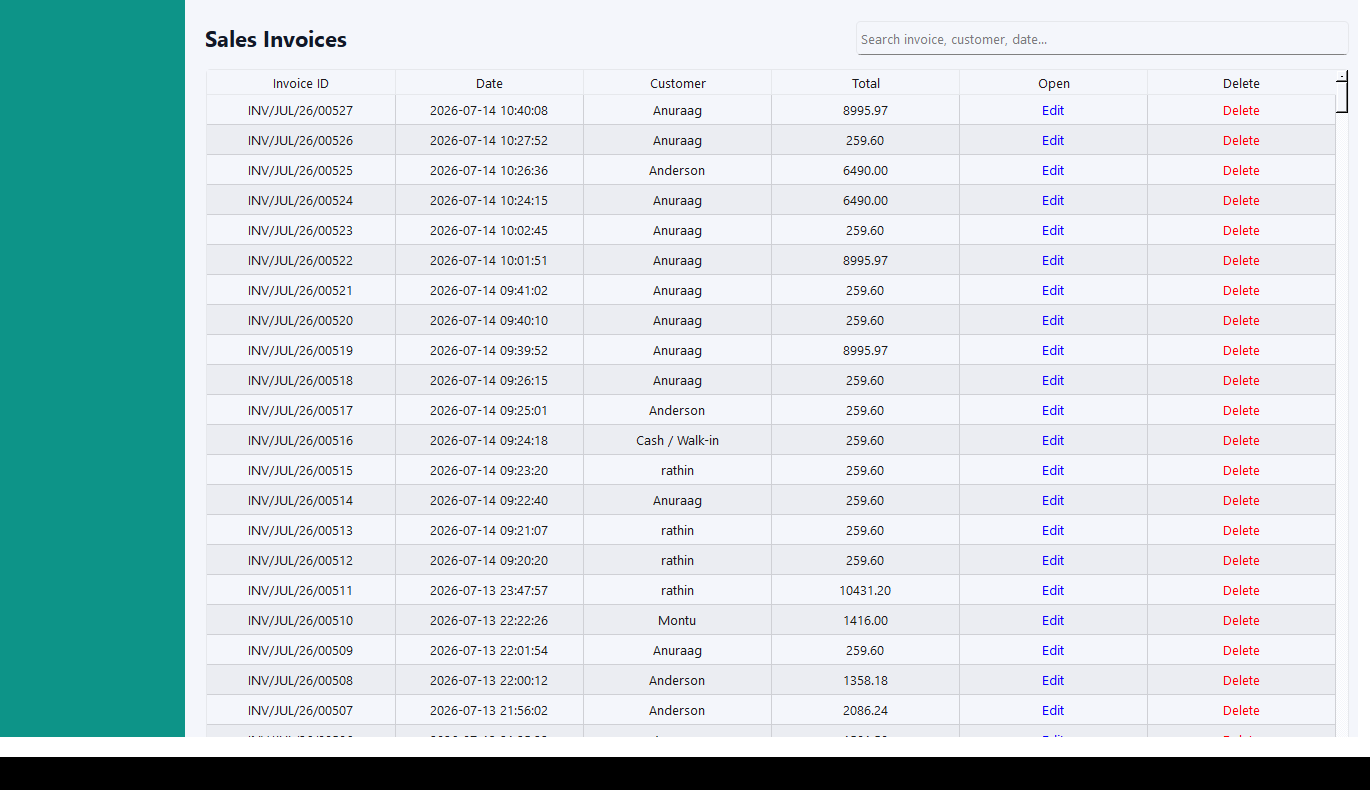
Full sales history, searchable in seconds.
- Table of every saved invoice: Invoice ID, Date, Customer, Total
- Search across invoice number, customer name or date
- "Edit" to reopen an invoice; "Delete" to remove one made in error
Profit Analysis
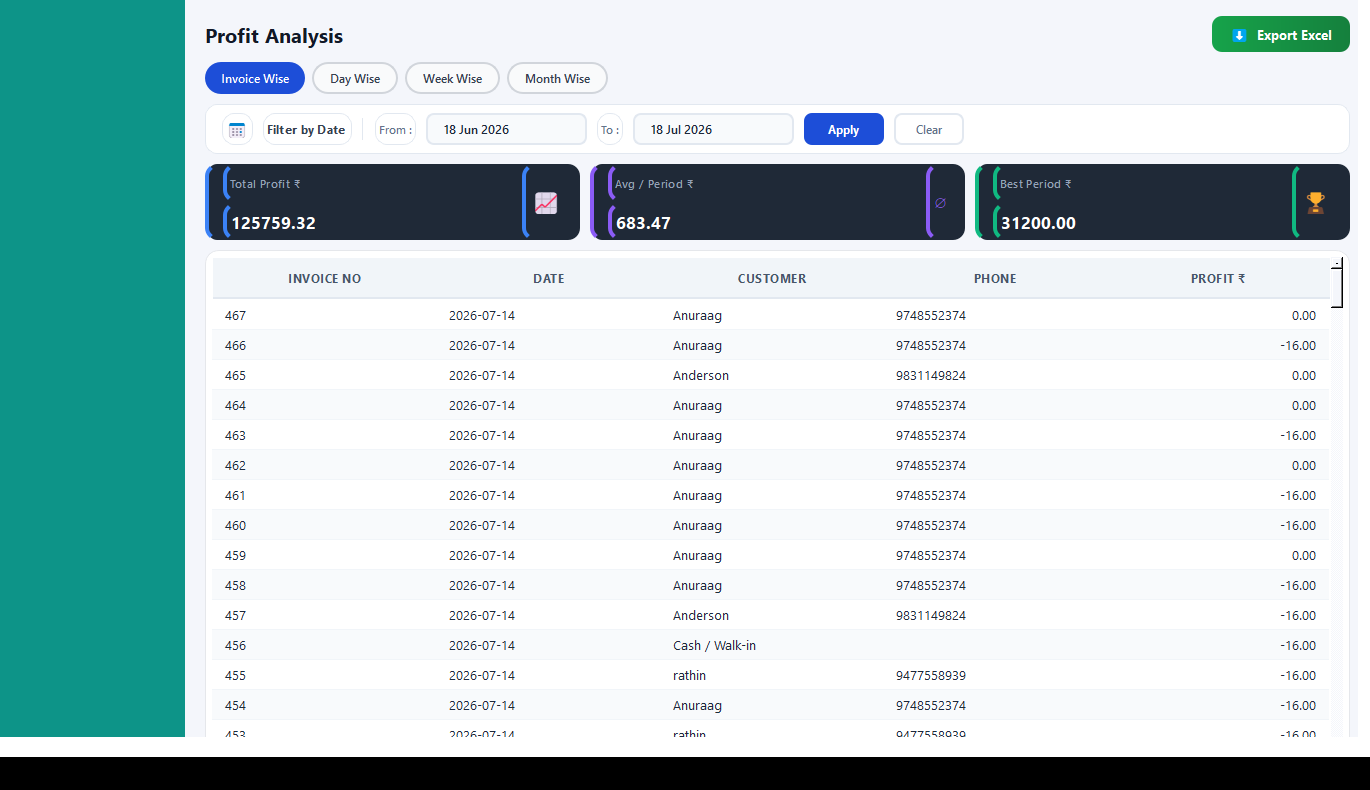
Real margin tracking — cost vs. selling price — not just revenue.
- Four views: Invoice Wise, Day Wise, Week Wise, Month Wise
- Filter by date, with Apply / Clear
- Summary cards: Total Profit, Avg / Period, Best Period
- Per-row detail: Invoice No., Date, Customer, Phone, Profit — including negative-profit rows so loss-making sales are visible, not hidden
- "Export Excel" for accounting handoff
Settings
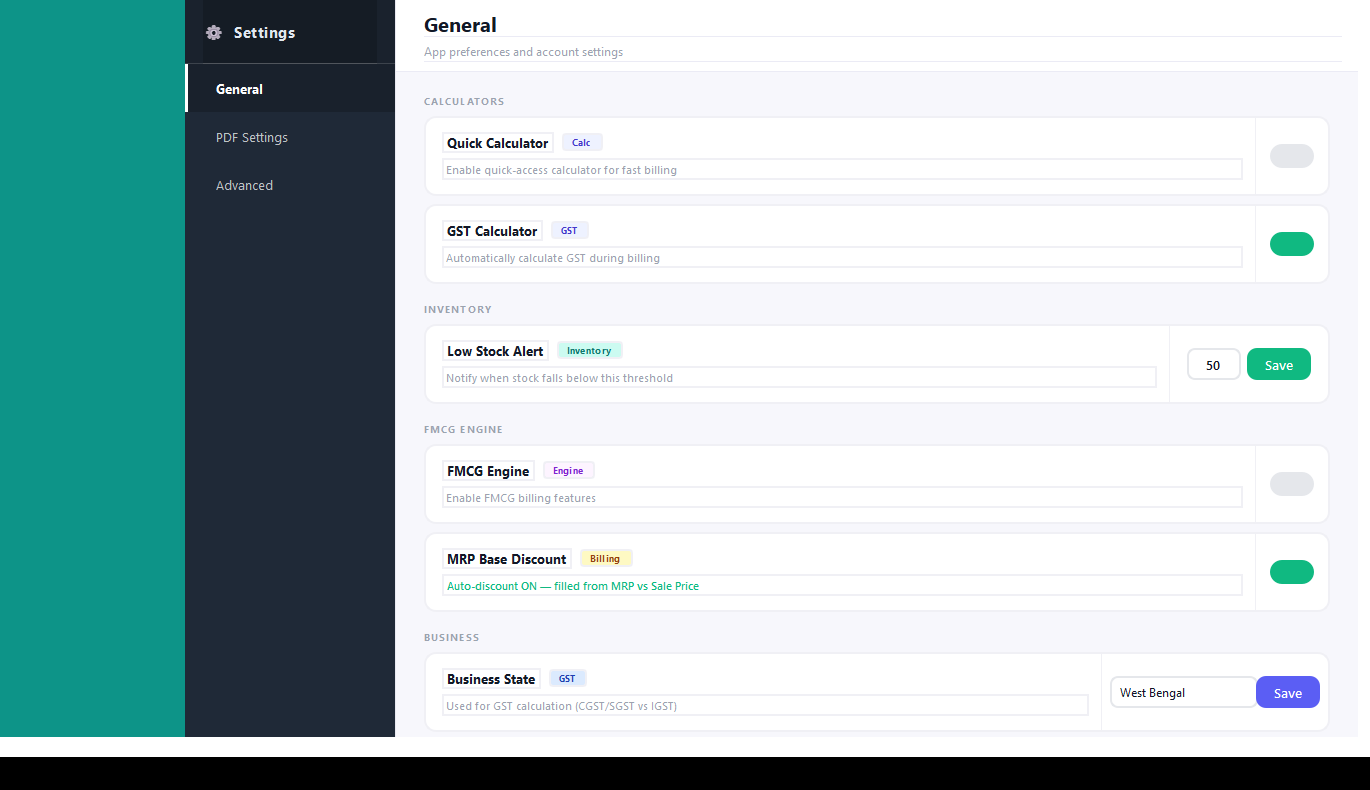
This is where General and FMCG behaviour are configured within the same install, alongside General, PDF Settings and Advanced sections in the sidebar.
Calculators
- Quick Calculator — enable a quick-access calculator for fast billing
- GST Calculator — automatically calculate GST during billing
Inventory
- Low Stock Alert — set the stock threshold that triggers the Dashboard's Low Stock counter
FMCG engine
- FMCG Engine — a dedicated toggle that turns on FMCG-specific billing features inside this same install
- MRP Base Discount — when on, the item discount is auto-filled from the gap between MRP and Sale Price
Business
- Business State — used to determine CGST/SGST vs. IGST during billing
Backup & Restore
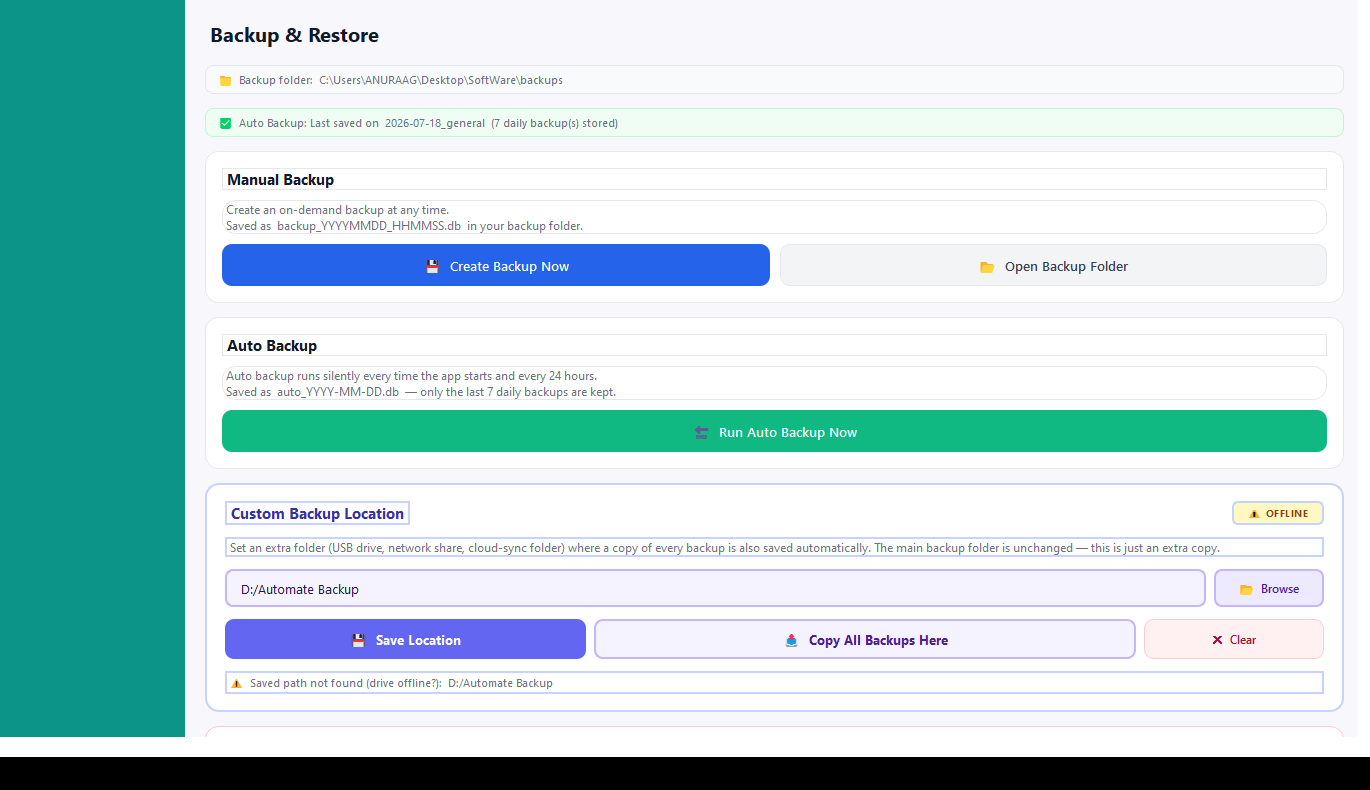
Your data, protected automatically — no manual routine required.
- Automatic backup on every app start and every 24 hours, saved as
auto_YYYY-MM-DD.db— the last 7 daily backups are kept - Manual "Create Backup Now" button, saved as
backup_YYYYMMDD_HHMMSS.db, plus "Open Backup Folder" for direct file access - "Run Auto Backup Now" to force an immediate automatic-style backup on demand
- Optional Custom Backup Location mirrors every backup to a second folder (USB drive, network share, cloud-sync folder); an OFFLINE badge and warning appear if that path can't currently be reached